|
|
Writing a Simple JavaBean |
Beans become significant when you add properties and events. Properties are analogous to instance variables inside of objects. Event handlers are analogous to behaviors or methods defined for objects. The main difference is that properties and events are exposed to builder tools to enable visual manipulation of beans. Values assigned to properties can be modified at design time. Similarly you can visually select event handlers from list boxes to link the events generated by one bean to corresponding event handlers available in another bean. Properties are the natural place to start.Bean with color property (Acme02Bean)
The next step is to add a property to the beans. This is straightforward.Begin by adding a private instance variable, beanColor, to draw the foreground of the bean when it is rendered with the paint callback method.
Next you want to make a property, which you do by defining two methods with nearly identical names.private Color beanColor = Color.blue;
The definition of a property is based on the signature pattern of the methods defined in the class. The general semantics of the names are:public Color getColor() { return beanColor; } public void setColor(Color newColor) { beanColor = newColor; repaint(); }
    getPROPERTY
    setPROPERTY
Of course, the string "PROPERTY" must be altered for each newly defined property. Thus the previous method pair implements the interface for a
colorproperty. You can define an unlimited pair of methods following this pattern; in each case, PROPERTY must be a unique name.The actual name of the instance variable that is modified or retrieved by the pair does not matter. The instance variable modified by getColor and setColor is beanColor, though it could just as easily have been
colororfoo.Here's the full source code for the second example, Acme02Bean.
Compare the property sheet for the first bean:import java.awt.*; import java.io.Serializable; public class Acme02Bean extends Canvas implements Serializable { public Acme02Bean() { setSize(60,40); } public void paint(Graphics g) { g.setColor(beanColor); g.fillRect(20, 5, 20, 30); } public Color getColor() { return beanColor; } public void setColor(Color newColor) { beanColor = newColor; repaint(); } private Color beanColor = Color.blue; }
and the second bean:
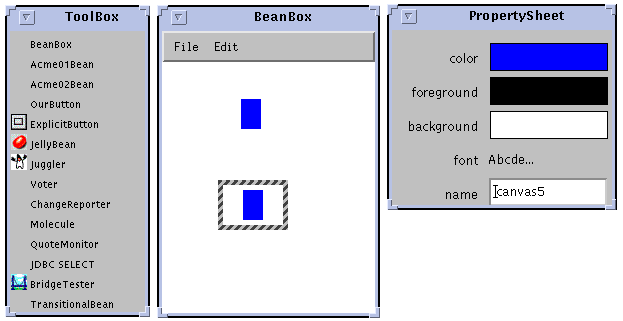
This figure shows that the introspection mechanism in BeanBox finds the matching pair of getColor and setColor methods required to define a
colorproperty.
Beans and Packages (Acme03Bean)
Typically, beans you buy from a third party, or beans that you make yourself should be installed in a unique location in relation to other beans. The way to keep everything in its proper place is to use Java packages. The next change is simple in deed, but there are some important concepts to learn from this simple change. Add the following line to the top of your file:package acme.beans;
With this third example (Acme03Bean) based on packages, you will now need to create a directory structure so the Java compiler can put the generated class files in the proper locations. You'll want to define the package name for classes that go in your package.
You will also need to import the package to files that use classes from the package.
Include the full name of the package and class when making a JAR file to include beans that are part of a package. JAR files are a new form of archive file introduced in JDK 1.1 and are the preferred packaging mechanism for shipping beans which are built from multiple files--including both class files and image files.
Here's how to create the appropriate directory structure for the acme.beans package below the current working directory.
Assuming a package name of "acme.beans" create directories for Java source files and Java class files:
Now copy the Java source file (or files) to the appropriate place in the source tree:mkdir -p ./src/acme/beans mkdir -p ./classes/acme/beans
cp -p Acme03Bean.java ./src/acme/beans
Bean with label property (Acme04Bean)
Next, add an instance variable to hold a String label for the Bean.
private String label;Now that an instance variable is defined, you'll want to assign it a default value in the bean's constructor. It makes sense to set the font used to render the label inside the constructor as well. Add the following two lines.
Eventually this bean will be crafted to behave like a button. You'll want to be able to customize the label for the button from within a builder tool (BeanBox, for example). To enable design-time customization you'll need to add athis.label="Bean"; setFont(new Font("Dialog", Font.PLAIN, 12));labelproperty to the bean. To do this, addgetLabelandsetLabelmethods to the class.
    public String getLabel() {
        return label;
    }

    public void setLabel(String newLabel) {
        String oldLabel = label;
        label = newLabel;
    }
The approach is identical to adding the
colorproperty earlier in the lesson.While you're at it, you can render the bean to look more like a button by adding a few lines to the end of the
paintcallback method.
The definition for paint should look like this.g.fillArc(5, 5, 30, 30, 0, 360); g.fillArc(25, 5, 30, 30, 0, 360); g.setColor(Color.blue); int width = size().width; int height = size().height; FontMetrics fm = g.getFontMetrics(); g.drawString(label, (width - fm.stringWidth(label)) / 2, (height + fm.getMaxAscent() - fm.getMaxDescent()) / 2);When the button is drawn, it looks something like a bean.public void paint(Graphics g) { g.setColor(beanColor); g.fillRect(20, 5, 20, 30); g.fillArc(5, 5, 30, 30, 0, 360); g.fillArc(25, 5, 30, 30, 0, 360); g.setColor(Color.blue); int width = size().width; int height = size().height; FontMetrics fm = g.getFontMetrics(); g.drawString(label, (width - fm.stringWidth(label)) / 2, (height + fm.getMaxAscent() - fm.getMaxDescent()) / 2); }
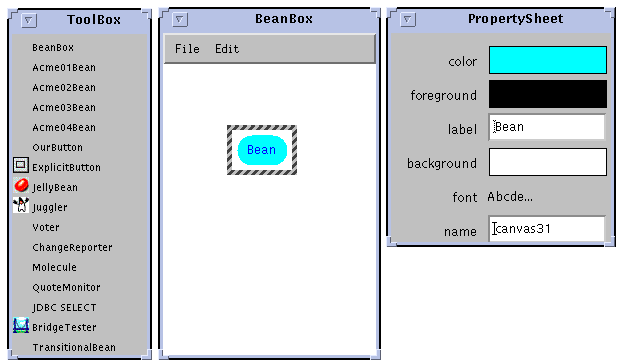
The property sheet now shows fields for both the
colorandlabelproperties. You can customize either one of these properies at design time by editing the property sheet. You'll notice that the color of the button has been changed from blue to cyan. This was done by changing the initializer for the beanColor instance variable.
This new bean-like shape is due to the two new calls to fillArc in the bean's paint methodprivate Color beanColor = Color.cyan;These calls add a rounded left and right side to the original square rendering of the bean. The remaining code in the paint method ensures the String label is centered within the button's bounding box.g.fillArc(5, 5, 30, 30, 0, 360); g.fillArc(25, 5, 30, 30, 0, 360);
        int width = size().width;
        int height = size().height;
        FontMetrics fm = g.getFontMetrics();
        g.drawString(label, (width - fm.stringWidth(label)) / 2,
                          (height + fm.getMaxAscent() - fm.getMaxDescent()) / 2);
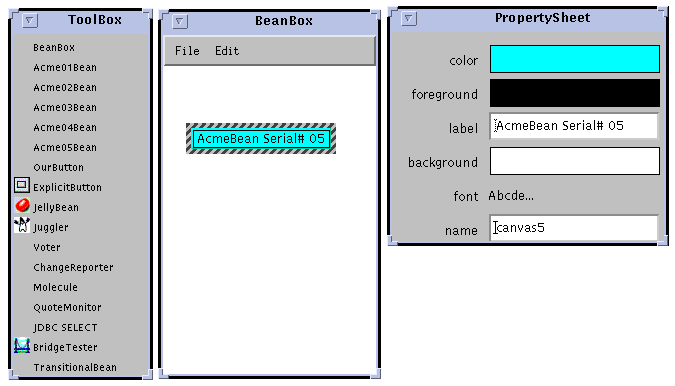
Automatic Sizing of Beans (Acme05Bean)
So far, a default label has been supplied for the bean by its constructor. A good design should let you override this default label by defining a second constructor which accepts a String argument.
Having a customizable label displayed on a bean poses new challenges. Keep in mind that the label can be set programatically by the constructor, changed at design time by a builder tool, or modified at run time by a call to setLabel.public Acme05Bean(String label) { super(); this.label = label; setFont(new Font("Dialog", Font.PLAIN, 12)); }Some flexibility must be built in to the sizing of the bean. What happens, for example, if the label is too long? Obviously the bean's bounding box must be adjusted to accommodate the label supplied to the constructor. A call to resize command, hard coded in the constructor, makes no sense once you make it possible to customize the bean's label.
It turns out that the Beans API provides a convenient way for you to specify the preferred size of a bean and to do so on the fly. You simply define methods specifying the preferred size and the minimum size of your bean. The details will be covered in the following paragraphs.public Acme04Bean() { // obsolete constructor resize(60,40); // << not flexible enoungh // for customizable label this.label="Bean"; ... }Knowing that a technique for automatic sizing is available, you can drop the call to resize from the constructor. Because you have defined a constructor accepting a String argument, the role of the default constructor can be reduced to supplying a default label for the button.
The default label is long intentially to show how a button can size itself automatically. There are two occasions where a button needs to adjust itself to accommodate the size of its label. The first is when the button is first created, for example when the button is selected from the palette of a builder tool and dropped onto a form. The second case is when the button label is modified during design time by editing the label with the property sheet.public Acme05Bean() { this("AcmeBean Serial# 05"); }
Defining Preferred and Minimum Sizes for Beans
If you defined a method named getPreferredSize, BeanBox calls it automatically when you drag a new instance of the bean from the component palette and drop it on the application form.
This algorithm is similar to the size calculation carried out in the bean's paint method to center the string within the button. Padding is added outside of the string so the label doesn't appear crowded. In this case, however, a dimension for the preferred size is returned, rather than drawing the string inside of the button. Symbolic constants for the padding are defined as instance variables for the bean to be used as padding around the button.public Dimension getPreferredSize() { FontMetrics fm = getFontMetrics(getFont()); return new Dimension(fm.stringWidth(label) + TEXT_XPAD, fm.getMaxAscent() + fm.getMaxDescent() + TEXT_YPAD); }
In addition to a preferred size for your bean, the beans API lets you specify a minimum size. Both are used to help builder tools determine how to draw your bean at design time. To keep things simple, the minimum size of the bean, in this case, is defined to be the same as the preferred size.static final int TEXT_XPAD = 12; static final int TEXT_YPAD = 8;The other sizing issue you must worry about, is when someone using your bean want to change its size at design time by editing the label from a property sheet. In previous version of the bean, you could change the label at design time, but the button would not resize itself when the label gets too long to be visible inside the button. For typical buttons, you want the button to change its size each time the label is changed from the property editor--that is with each key stroke the label should grow or shrink according the the new size of the lable. The workhorse behind this resizing is a new method, sizeToFit.public Dimension getMinimumSize() { return getPreferredSize(); }
Notice thatprivate void sizeToFit() { Dimension d = getPreferredSize(); resize(d.width, d.height); Component p = getParent(); if (p != null) { p.invalidate(); p.layout(); } }getPreferredSizeis called here, as well as by the builder tool, whenever the size of the bean must be recalculated. The call to resize is made here now, instead of in the constructor as in previous version of the bean. You could name this sizing method anything you want, as long as you call it fromsetLabel. ThesetLabelmethod is called automatically by the builder tool (BeanBox for example) with each keystroke modification made to the label property from the property sheet editor. DefiningsizeToFitas a workhorse method simplifies the modifications that must be made to setLabel; you need only add a single line to the end of the method.
The final change in version 5 of AcmeBean causes it to be drawn using a 3D effect. It now looks more like a standard AWT button than a bean.public void setLabel(String newLabel) { String oldLabel = label; label = newLabel; sizeToFit(); // << new }
The calls to fillArc and fillRec with hard-coded dimensions have been removed
and replaced with a rectangular rendering of the button, based on the width and height of the Canvas on which it is drawn.// obsolete version public void paint(Graphics g) { ... g.fillRect(20, 5, 20, 30); g.fillArc(5, 5, 30, 30, 0, 360); g.fillArc(25, 5, 30, 30, 0, 360); ... }
The last argument to draw3DRect is a boolean that determines whether the rectangle should appear raised or depressed. Eventually this call will be modified so that the visual display of the button reflects the up or down state of the left mouse button as the mouse button is pressed and released over the bean.g.fillRect(1, 1, width - 2, height - 2); g.draw3DRect(0, 0, width - 1, height - 1, true);In addition, a line border is drawn just around the outside edge of the button.
g.drawRect(2, 2, width - 4, height - 4);The paint method should also be synchronized to keep things tidy. Here's the entire new definition:
    public synchronized void paint(Graphics g) {

        int width = size().width;
        int height = size().height;

        g.setColor(beanColor);
        g.fillRect(1, 1, width - 2, height - 2);
        g.draw3DRect(0, 0, width - 1, height - 1, true);

        g.setColor(getForeground());
        g.setFont(getFont());

        g.drawRect(2, 2, width - 4, height - 4);

        FontMetrics fm = g.getFontMetrics();
        g.drawString(label, (width - fm.stringWidth(label)) / 2,
                          (height + fm.getMaxAscent() - fm.getMaxDescent()) / 2);
    }
Event Handlers for Beans (Acme06Bean)
The next modification lays the groundwork for turning a bean into a useful component. Event handling is the key. Define a new method:
The handler doesn't do anything useful yet; it merely let's you test that events are being caught by the bean. It's best to start with a small method defninition for handleEvent to make sure everything is working; the switch statement can grow large rather quickly, so it's best to be sure you are building on a solid foundation.public boolean handleEvent(Event evt) { if (! isEnabled()) { return false; } switch (evt.id) { case Event.MOUSE_UP: System.err.println("MOUSE_UP fired:"); return true; } return false; }For now, a message is printed to the applications stderr file whenever a MOUSE_UP event is handled by the bean. Overriding the handleEvent uses the older JDK 1.0.2 style of event handling, as opposed to the new JDK 1.1 event source and event listener style of event handling. Either technique will work. The older style is used here to reduce the number of new concepts you need to master to get simple beans up and running. For an explantion of the new delegation event model found in JDK 1.1 see [href to JDK 1.1 Spec, event section].
Firing Events from Beans (Acme07Bean)
Now you're ready to add useful event processing tohandleEvent. Most of the code will be implemented in a helper function calledfireEvent.Once you are confident that events are being caught by handleEvent, remove the
printlnprint stub
and replace it with a call tocase Event.MOUSE_UP: System.err.println("MOUSE_UP fired:"); // << remove ... }fireAction.
Before you can define fireAction, you'll have to import some classes and define some instance variables. First the new import statements:public boolean handleEvent(Event evt) { if (! isEnabled()) { return false; } switch (evt.id) { case Event.MOUSE_UP: fireAction(); // << new call return true; } return false; }
The reason for importing the event package is clear; you need it to define ActionEvent objects and generate events. The need for a Vector requires some explanation of the new event source, event listener model defined for JDK 1.1.import java.awt.event.*; ... import java.util.Vector;A Bean that wants to generate events needs a way to keep track of interested event targets. In the delegation event model, the event mechanism is broken up conceptually into event dispatch and event handling. Event dispatch is the responsibility of the event source; event handling is the responsibility of the event listener. Any object that wants to know when an event is fired by a bean can tell the bean it wants to be informed about particular events. In other words, an event listener registers interest in an event by calling a predetermined method in the event source.
To make the discussion concrete, consider a button bean (like the one you are defining in this lesson) that generates events when pressed, and a counter object that will be incremented each time a button is pressed.
If the button bean wants to be an event source, it must provide two methods that can be called by interested objects. One method adds the caller to the list of listeners who are notified when the event occurs. The other method removes the caller from the list of interested listeners.
public synchronized void addActionListener(ActionListener l) { ... }Once again, patterns are used in the signature of the method names. The pattern of the method's signature is detected by Java's new introspection mechanism, which can tell what events the source will generate from the name of the registration methods, together with the type of the arguments of the registration methods. For a detailed explanation see [href to Beans Spec, section 6.5 Event Listener Registration].public synchronized void removeActionListener(ActionListener l) { ... }The general pattern for event generation capabilities recognized by Java's introspection mechanism is as follows:
wherepublic synchronized void addTYPE(TYPE listener); public synchronized void removeTYPE(TYPE listener);TYPEis replaced by the class name of the particlular event listener.In the case of the above event registration methods, defined for the bean button, Java's introspection mechanism is able to determine that an ActionEvent can be generated by the button. If the counter object wants to be notified when an ActionEvent occurs, it calls addActionListener, giving itself as an argument. In order for this to work, the counter object would have to implement the ActionListener interface, because an ActionListener object is accepted as the argument to addActionListener.
The bean button needs a way to keep track of all of the listeners who might register to receive notification of ActionEvents. This is where the Vector import statement comes into play. A list (or Vector) of listeners is maintained by the beanButton.
When addActionListener is called, the listener supplied as an argument is appended to the Vector of listeners.public class Acme07Bean extends Canvas implements Serializable { ... private Vector listeners = new Vector(); ... }
Similarly, when removeActionListener is called, the listener supplied as an argument to the method is removed from the list of listeners.public synchronized void addActionListener(ActionListener l) { listeners.addElement(l); }
    public synchronized void removeActionListener(ActionListener l) {
        listeners.removeElement(l);
    }
Dispatching Events to Event Listeners
When an event is fired, the event source (the bean button) iterates over the list of listeners, sending each a notification of the ActionEvent.
Now you can define the required instance variables.public void fireAction() { ... Vector targets; synchronized (this) { targets = (Vector) listeners.clone(); } ActionEvent actionEvt = new ActionEvent(this, 0, null); for (int i = 0; i < targets.size(); i++) { ActionListener target = (ActionListener)targets.elementAt(i); target.actionPerformed(actionEvt); } ... }The new fireAction method makes use of both these instance variables. The debug instance variable can be used to control the printing of stub information when handleEvent is called. By making debug a property, you can change it's value inside a builder tool. This is very handy in BeanBox where you can turn debugging on and off for each individual button to get just the amount of feedback you need for diagnosing a particular problem.private boolean debug = true; ... private Vector listeners = new Vector();To make debug a property, simply define setDebug and getDebug methods.
Makingpublic void setDebug(boolean x) { boolean old = debug; debug = x; } public boolean getDebug() { return debug; }debuga property lets you alter the reporting of events through a println stub on the fly by changing the value of the property from false to true using a property sheet editor. When debug is true calls to fireAction are reported to the users by printing the label of the button that fired the event.
The newly defined bean can now act as an event source for ActionEvent objects. You can verify that this is true, by adding the bean to the BeanBox component palette, then trying to hook up the bean's ActionEvent to start or stop the Duke Juggler bean.public void fireAction() { if (debug) { System.err.println("Button " + getLabel() + " pressed."); } Vector targets; synchronized (this) { targets = (Vector) listeners.clone(); } ActionEvent actionEvt = new ActionEvent(this, 0, null); for (int i = 0; i < targets.size(); i++) { ActionListener target = (ActionListener)targets.elementAt(i); target.actionPerformed(actionEvt); } Component parent = getParent(); if (parent != null) { parent.postEvent(new Event(this, Event.MOUSE_DOWN, null)); } }Notice that the event menu lists an Action item for this bean, meaning it can be used like the ExplicitButton or OurButton beans provided as BeanBox examples. In fact, it would be a good exercise to use two instances of Acme07Button to start and stop Duke's juggling routine.
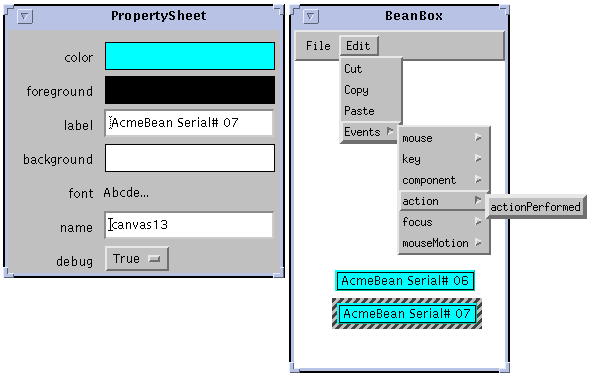
Notice that the sixth version of the button (Acme06Button) did not provide methods to register ActionEvent listeners and therefore could not fire action events. Java introspection does not find action events defined for Acme06Button, so no action event appears in the Events menu. When comparing property sheets, notice also that when an Acme07Bean is selected, you can edit the debug property by using a boolean choice selector.
Version seven (Acme07Bean) required a substantial number of additions. To summarize, Canvas's handleEvent method was overridden to capture and dispatch mouse events received by the button. A fireAction method was defined and called from handleEvent on mouse up events. In order for the bean to act as an event source to one or more event listener objects, two methods were defined to add and remove interested listners. A vector was added as an instance variable to keep track of registered listeners. Finally, a
debugvariable was defined to control the printing of debug information. Makingdebuga property lets you turn debugging on and off at your convenience while experimenting with beans you are developing and testing inside BeanBox.A pointer to the entire source listing for Acme07Bean is provided again here for convenience.
Making a Bean Bounce like a Button (Acme08Bean)
With two simple changes, you can make the button behave visually, like a regular AWT button. That is, when the button is pressed, it appears to lower itself; when it is released, it appears to raise itself again.First add an instance variable,
down, to keep track of whether the button is in a pressed or released state.Inside the paint method that draws the button, change the rendering to depend on the value ofprivate boolean down;down. Change
tog.draw3DRect(0, 0, width - 1, height - 1, true);
Before this modification, the button was always drawn in theg.draw3DRect(0, 0, width - 1, height - 1, !down);raisedparameter (the last argument) and was always given a value of true.Now
raisedis true only whendownis false.To make this all work properly, you must write a small amount of maintenance code to be sure
downalways has the right value. The place to do this is in handleEvent.First add a new case clause handle mouse down events.
This code sets the remembered button state to down, requests that the button be redrawn and returns true to indicate the event has been handled. Besides this, you'll have to change the case clause for mouse up frompublic boolean handleEvent(Event evt) { ... switch (evt.id) { case Event.MOUSE_DOWN: down = true; repaint(); return true; ... }
tocase Event.MOUSE_UP: fireAction(); return true;Formerly, the button was not redrawn on a mouse event. Now it is always redrawn whether the event is a press or a release. More precisely, the button is only redrawn in a mouse up event if it was already in a down state.... case Event.MOUSE_UP: if (down) { fireAction(); down = false; repaint(); } return true; ...fireActionis called, as before, to dispatch the ActionEvent to any register listeners.
Next Stop: BeanBox
Now that you've seen how to build basic beans you're ready for some more complex examples. Before looking at contstrained properties and advanced event generation and handling techniques, you'll want to learn how to use BeanBox to test your beans. BeanBox will be covered in the next installment of this tutorial.
|
|
Writing a Simple JavaBean |