A. Goals
The purpose of this assignment is to practice using object types and learn about object-oriented design principles. The specific goals are to:
- Learn how to create user-defined data types in Java
- Implement and use a data structure
- Simulate a musical instrument using your computer's keyboard using an algorithm
- Learn about digital audio
B. Background
When you pluck a string on a musical instrument, the middle of the string bounces wildly up and down. Over time, the tension in the string causes it to move more regularly and less violently, until it finally comes to rest. High frequency strings have greater tension, which causes them to vibrate faster, but also to come to rest more quickly. Low frequency strings are looser, and vibrate longer.
In this assignment, you will write a program to simulate plucking a guitar string using the Karplus-Strong algorithm. This algorithm played a seminal role in the emergence of physically modeled sound synthesis (in which a physical description of a musical instrument is used to synthesize sound electronically).
From a mathematical physics viewpoint, the Karplus-Strong algorithm approximately solves the 1D wave equation, which describes the transverse motion of the string as a function of time.
C. Your program
You will write a program Guitar.java that uses
a RingBuffer class and
a GuitarString class to create a simulation of
a guitar, implementing the Karplus-Strong algorithm.
D. Getting started
- Download the
skeleton
RingBuffer.javafile, and save it in your folder for this homework assignment. - Download the
skeleton
GuitarString.javafile, and save it in your folder for this homework assignment. - Download
MiniGuitar.java. This program will help you testRingBufferandGuitarString, and serve as a starting point for the fullGuitarprogram that you will write.
This assignment was originally developed by Andrew Appel, Jeff Bernstein, Maia Ginsburg, Ken Steiglitz, Ge Wang, and Kevin Wayne. It was adapted by Benedict Brown.
The components that make the Karplus-Strong algorithm work are the ring buffer feedback mechanism and the averaging operation.
A. The ring buffer
We model the position of the string using a ring buffer data structure. The ring buffer models the medium (a string tied down at both ends) in which the energy travels back and forth. Sonically, the feedback mechanism reinforces only the fundamental frequency and its harmonics (frequencies at integer multiples of the fundamental).
We model a guitar string by sampling its displacement from
the rest position at numSamples points that
are equally spaced points in time. The displacement is a
real number between -1/2 and +1/2 (0 represents the rest
position itself), and numSamples is
calculated as the sampling rate (44,100 Hz)
divided by the fundamental frequency (rounding the
quotient up to the nearest integer). For instance,
each point in the image below represents a displacement of
the string from the rest position.

A pluck of the string is modeled by filling the
ring buffer with random values, just as a physical string bounces wildly when plucked.
The string can contain energy at any frequency. We simulate a pluck with white noise
by setting each of these numSamples displacements to a random real number between -1/2 and +1/2.

B. The Karplus-Strong algorithm
After the string is plucked, it vibrates. The pluck causes a displacement which spreads wave-like over time. The Karplus-Strong algorithm simulates this vibration by repeatedly deleting the first sample from the ring buffer (.2 in the below example) and adding to the end of the buffer the average of the first two samples (.2 and .4), scaled by an energy decay factor of 0.991.
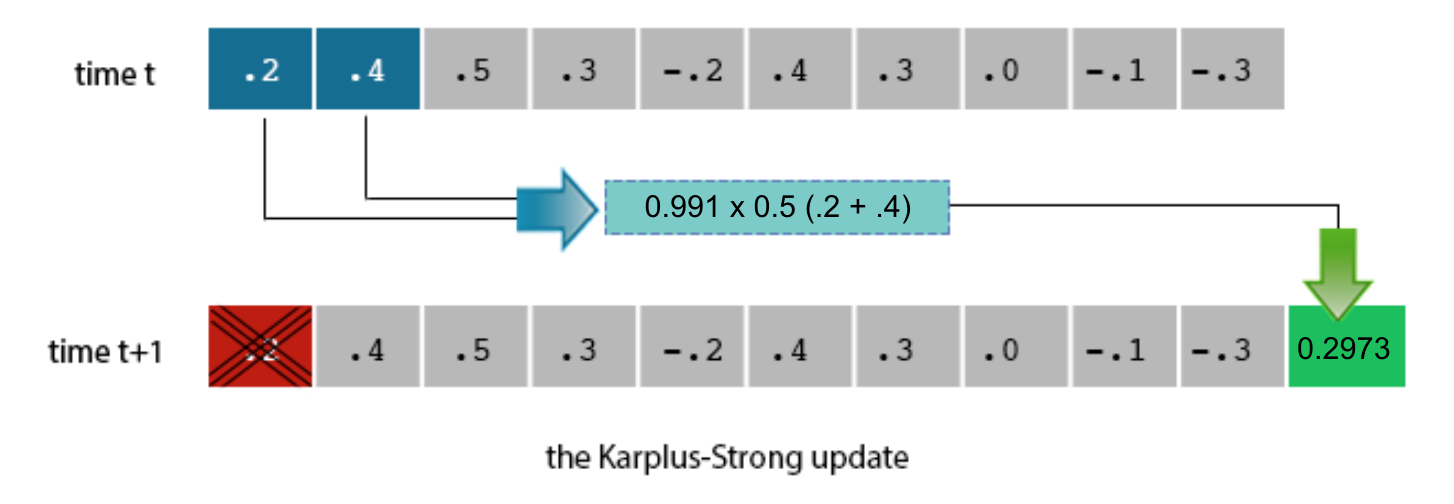
Averaging neighboring samples brings them closer together, which means the changes between neighboring samples become smaller and more regular. The decay factor reduces the overall amount that a given point on the string moves, so that it eventually comes to rest. The averaging operation serves as a gentle low-pass filter, removing higher frequencies while allowing lower frequencies to pass. Because it is in the path of the feedback, this has the effect of gradually attenuating the higher harmonics while keeping the lower ones, which corresponds closely with how a plucked guitar string sounds.
The ring buffer length determines the fundamental frequency of the note played by the string. Longer ring buffers are analogous to longer strings on practical instruments, which produce notes with lower frequencies. A long ring buffer goes through more random samples before getting to the first round of averaged samples. The result is that it will take more steps for the values in the buffer to become regular and to die out, modeling the longer reverberation time of a low string.
Frequently Asked Questions
This document features a list of frequently asked questions about this assignment. Please refer to it if you have a question to see if the question is answered here before posting on Piazza.Help Video
To help understand the role of the RingBuffer better, take a look at this video< made by Professor McBurney. Please watch the video before asking questions about RingBuffer on Piazza or in office hours.RingBuffer
In this section you will write
RingBuffer and test it in RingBufferTest. The ring buffer is the
data structure that underpins the Karplus-Strong
algorithm.
RingBuffer will implement the following API:
public class RingBuffer
-----------------------------------------------------------------------------------------
RingBuffer(int capacity)  // create an empty ring buffer, with given max capacity
int getFirst()            // get the value of the first variable - this is ONLY used for testing
int getLast()             // get the value of the last variable - this is ONLY used for testing
double[] getBuffer()      // get the array stored in bufferArray - this is ONLY used for testing
int currentSize()         // return number of items currently in the buffer
boolean isEmpty()         // is the buffer empty?
boolean isFull()          // is the buffer full?
void enqueue(double x)    // add item x to the end
double dequeue()          // delete and return item from the front
double peek()             // return (but do not delete) item from the front
Start with the
provided RingBuffer.java
skeleton, then fill in the
constructors and methods one by one. Compile frequently,
and add code to RingBufferTest to test each method as
you write it.
You must follow the API above. We will be testing the methods in the API directly. If your method has a different signature or does not behave as specified, you will lose a substantial number of points. You may not add public methods or instance variables to the API; however, you may add private methods (which are only accessible in the class in which they are declared). You may also add private instance variables for data that must be shared between methods.
In the skeleton file, we have already declared some instance variables for you:
public class RingBuffer {
    private double[] bufferArray; // items in the buffer
    private int first;            // index for the next dequeue or peek
    private int last;             // index for the next enqueue
    private int currentSize;      // number of items in the buffer
}
A. Constructor
RingBuffer(int capacity) constructs a new ring buffer with
the given capacity by allocating and initializing the double array
bufferArray with
length capacity. Observe that this
allocation of bufferArray must occur in the
constructor (and not when you declare the instance
variables), since otherwise you would not know how big to
make the array.
B. Ring Buffer Help Video
The below video should help you understand how RingBuffer works.
C. Methods
Write the remaining methods
of RingBuffer.
On this assignment, you are required to test every function. You must write a file called RingBufferTest.java. This file will include JUnit tests for all your methods. The explicit testing requirements are below in section D. We encourage you to look at them as you are writing each method.
We recommend using
Every time you implement a method, immediately add code to test it through JUnit.
We have
also included a private
method printBufferContents() that prints out the
contents of a RingBuffer object for
inspection. You can use this function in mainto help you debug, but this function should not be used in your JUnit tests. If you add any instance variables of your own,
you will need to update this method to print them out
too.
Test cases are a great area for collaboration! You may not look at each other's code, but you are encouraged to discuss what test cases to implement with your classmates, and also to compare the output of your tests with each other. Just remember to note this in your help log. That is, note who you design test cases with.
For performance reasons, your implementation
of RingBuffer must wrap around in
the array. To do this, maintain one integer instance
variable first that stores the index of the
least recently inserted item; maintain a second integer
instance variable last that stores the index
one beyond the most recently inserted item. Ring
buffers that wrap around like this are very common in
audio and graphics applications because they avoid
allocating data or moving memory around. Remember that
you will be updating your ring buffers 44,100 times per
second. To manage that, each update has to do as little
work as possible.)
getFirst(),getLast(), and getBuffer()
should be simple getters (a.k.a., accessors) that return the value of the variables
first, last, and buffer. These should ONLY be used in your JUnit tests (inside the
RingBuffer class, you should just use the variables first,
last, and bufferArray directly.
isFull()
and isEmpty() return whether buffer
is at capacity and whether it is completely empty. Go
ahead and write these now. You can do a little bit of
testing already by checking whether the buffer created in
main is full or empty. It should always be empty since
you haven't added anything to it yet. Likewise, it should
only be full if capacity is zero. Once you
implement enqueue you'll be able fill up your
buffers.
enqueue(double x) inserts the value of x at the
end of the ring buffer, putting it at
index last (and
incrementing last). Test it by enqueuing a
variety of different values in main and
printing the contents of the object. Think about what
situations might trigger errors and make sure you test
them.
dequeue() removes an item, taking
it from index first (and
incrementing first). Mix calls
to dequeue() with calls
to enqueue() in your testing code. Print
out values you dequeue() as well as the
remaining contents of the buffer.
When either the first or last
index is equal to the capacity, make that
index wrap around by changing its value
to 0.
peek() returns the first item in
the buffer without removing it. Mix some calls
to peek() in with the rest of your testing
code in main, and print what it returns to help test
it.
currentSize() returns the number of
items in the buffer. Keep in mind that the current size of
the RingBuffer (the number of items in it) is
not necessarily the same as the length of the array. To
get an accurate count of the number of items in
your RingBuffer, increment the instance
variable currentSize each time you add an item, and
decrement it each time you remove.
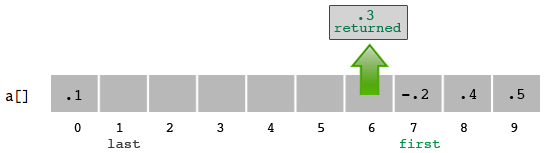
Here is a demonstration of how the enqueue()
and dequeue() methods work:
- Initial state

enqueue(0.5)

enqueue(0.1)

dequeue()
In the skeleton file, we have included exception-throwing
statements that crash your program when the client
attempts to dequeue() from an empty buffer
or enqueue() into a full buffer. This is a
mechanism for generating run-time errors in your program,
and will help you identify bugs. (Remember: once your
code is working properly, these conditions should never
occur, so your program should never crash. But if you has
a bug while you're developing it, you'd like your program
to crash immediately so it's easier to debug.) The
following is an example of a throw statement:
if (isEmpty()) {
    throw new RuntimeException("ERROR: Attempting to dequeue from an empty buffer.");
}
Leave these statements in your code, as they will be useful when debugging future sections of the assignment.
D. Mandatory Testing
You must also submit RingBufferTest.java. It must test the following methods. You need to create this file from scratch. When writing your tests,
use getFirst(),getLast(), currentSize() and getBuffer() to test the value of your RingBuffer fields. You will
find it useful to write a boolean function in your test program that takes in two arrays and returns true if they are equal (same length and contents) and false if they
are unequal. This is what you can use to test your bufferArray values.
- You are required to write at least one test for the constructor.
- You must write at least two tests each for
isEmpty()andisFull()(so 4 tests total). You should have one test for both that returns false, and one test for both that returns true. - You must have at least 3 tests each for
enqueueanddequeue(so 6 tests total). At least one test for each must test the wrap-around effect of RingBuffer. At least one test for each must test the error condition (we covered JUnit tests for error conditions in class, check the code posted for March 15). - You must have at least 2 tests for
peek(). One of the tests should check for an error.
Please add the following import statement after whatever existing imports you already have in RingBuferTest.java. It is paramount that you do this as our submission tests will not work without it.
import org.junit.Test;
For testing, you do have to check the array contents.
GuitarString
Next, write and test GuitarString, which
uses RingBuffer to implement the
Karplus-Strong algorithm. GuitarString should
implement the following API:
public class GuitarString
-------------------------------------------------------------------------------------------
GuitarString(double frequency)       // create a guitar string of the given frequency,
                                   // using a sampling rate of 44,100
void pluck()                       // set the buffer to white noise
void tic()                         // advance the simulation one time step
double sample()                    // return the current sample
int time()                         // return the total amount of tics
The design of your GuitarString class should
look like the provided
GuitarString.java
skeleton, except that you will need to
fill in all of the constructors and methods.
Again, you must follow the API above. We will be testing the methods in the API directly. If your method has a different signature or does not behave as specified, you will lose a substantial number of points. You may not add public methods or instance variables to the API; however, you may add private methods (which are only accessible in the class in which they are declared). You may also add private instance variables for data that must be shared between methods.
A. Constructor
GuitarString(double frequency)
creates a RingBuffer of
capacity numSamples,
where numSamples is the sampling rate of
44,100 Hz divided by frequency,
rounded up to the nearest integer. (Hint: Check
out Math.ceil().) The constructor then
fills the RingBuffer to represent a
guitar string at rest by enqueueing numSamples
zeros. The constant 44100 should be declared
as a static variable (because it is a
constant value that is shared by all guitar strings
that you create) in your GuitarString class.
Do not hardcode it in your constructor. Remember that
proper style for static variable names is to write them in
all-caps with underscores to separate words.
Writing a reasonable test case
for GuitarString is a bit of a pain, so we've
included a main function to get you started.
You are not required to use JUnit testing for GuitarString, and
honestly we wouldn't recommend trying, since it requires more
advanced JUnit techniques we haven't covered in class.
Eventually you may to think about cases that aren't
covered by what we provide you and add them. For now
though – if your constructor
works – the test we provide should at
least create a string with a capacity of 10 that is
initially full. The rest of the test that tics through a
bunch of samples won't work until you implement the
remaining methods.
B. Methods
Reminder: none of these methods should call getFirst(),
getLast(), or getBuffer(), as those methods only
existed for the sake of testing in your JUnit files.. You should not
use any of those three functions in GuitarString for enqueue and dequeue.
sample() should return the value of
the item at the front of the ring buffer.
pluck() should replace
all numSamples items in the ring buffer
with numSamples random values between -0.5
inclusive and +0.5 exclusive. To implement this, use a
combination of the RingBuffer methods to
replace the buffer with random values between -0.5 and
0.5.
tic() should apply the
Karplus-Strong update: compute the average of the first
two samples of the ring buffer, multiplied by the energy
decay factor (0.991), delete the sample at the front of
the ring buffer, then add the new sample to the end. The
constant 0.991 should be declared as a static variable in
your GuitarString class. Hint: don't rewrite
functions you have already implemented.
time() should return the total
number of times tic() was called.
C. Checkpoint
To test your GuitarString class, run it with
the given test code in main with a
command-line argument numSamples. The given
test code creates a GuitarString from some
samples, then runs tic()
numSamples times, printing the values of
time() and sample().
NullPointerException – Check the line
number provided in the stack trace. An object you are
using in this line has not been initialized correctly, and
thus has the value of null. Attempting to
access variables or call functions on a null
object will throw a
NullPointerException.
This main() method does not test all
methods. You may want to write your own code
in main() to test all aspects of this
class and convince
yourself that everything is
functioning properly.
However, we will not be grading tests written for the GuitarString class.
(You need not comment out any testing code that you
add in main()).
> java GuitarString 25
testString.buffer.isEmpty(): false
testString.buffer.isFull():  true
     0   0.2000
     1   0.4000
     2   0.5000
     3   0.3000
     4  -0.2000
     5   0.4000
     6   0.3000
     7   0.0000
     8  -0.1000
     9  -0.3000
    10   0.2973
    11   0.4460
    12   0.3964
    13   0.0495
    14   0.0991
    15   0.3469
    16   0.1487
    17  -0.0496
    18  -0.1982
    19  -0.0013
    20   0.3683
    21   0.4174
    22   0.2210
    23   0.0737
    24   0.2210
Guitar
Write a program Guitar.java that simulates a
37-string guitar with notes ranging from 109 Hz to 872
Hz.
A. MiniGuitar
Read MiniGuitar.java. MiniGuitar
is a two-string version of Guitar that you can
use to test your RingBuffer
and GuitarString classes before moving on to
write Guitar.
Run MiniGuitar, and type the lowercase
letters a and c into
the PennDraw window to pluck the two
strings. If you have completed RingBuffer
and GuitarString correctly,
run MiniGuitar to check to see that everything
works properly. You should hear two different pitches
corresponding to A and C every time you press
the a and c keys.
MiniGuitar uses PennDraw to
receive keystrokes and StdAudio to play
sound.
Notice that MiniGuitar adds the samples of
the GuitarStrings (i.e. superposes them) to
compute the sound sample to play.
Notice how MiniGuitar uses an infinite loop to
continually receive keystrokes from the user and generate
new music samples. This infinite loop ends when the
program terminates.
Error: dequeue/peek from an empty buffer
in MiniGuitar – You may not have initialized
the ring buffer to contain numSamples zeros
in your GuitarString(double frequency)
constructor.
Lack of sound when running MiniGuitar for
the first time – Make sure you have
tested GuitarString with
the main() provided in the skeleton file. If
that works, it is likely something wrong
with pluck() since the main()
provided for GuitarString does not test that
method. To diagnose the problem, print out the values
of sample() and check that they become
nonzero after you type the lower case
characters a and c.
Clicking when running MiniGuitar (either
one click, or continual clicking) – It's likely
that pluck() is working,
but tic() is not. The best test is to run
the main() provided
for GuitarString.
B. Guitar
Model your Guitar class on the
given MiniGuitar
code. Where MiniGuitar had
two GuitarStrings, Guitar has
37.
Guitar should behave such that when a
character of NOTE_MAPPING (defined below) is
pressed, Guitar plays the corresponding
note. The character at index i
of NOTE_MAPPING corresponds to
a GuitarString frequency of 436 ×
2(i - 24) / 12, so that the
character 'q' (character index0
of NOTE_MAPPING) is 110 Hz, 'i'
(index 12) is 218 Hz, 'v'
(index 24) is 436 Hz, and ' '
(index 36) is 872 Hz. You should declare a
static variable in Guitar for the value
436.0 and for NOTE_MAPPING (but you need not do so for
24 and 12).
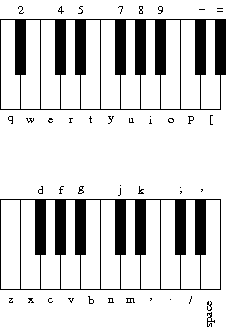
String NOTE_MAPPING = "q2we4r5ty7u8i9op-[=zxdcfvgbnjmk,.;/' ";
This keyboard arrangement imitates a piano keyboard: the "white keys" are on the qwertyuiop[ and zxcvbnm'./ rows and the "black keys" on the 1234567890-= and asdfghjkl;, rows of the standard US QWERTY keyboard layout.
The number 37 should not appear anywhere in your
code. Don't even think of using 37
individual GuitarString variables or a
37-way if statement. Instead, create an array
of GuitarString objects and
use NOTE_MAPPING.indexOf(key) to figure out
which key was typed, if any. Make sure your program does
not crash if a key is played that is not one of your
notes. (indexOf() returns -1 if the
string does not contain the
character key.)
You need not worry about
calling StdAudio.play() with a value greater
than 1.0 or less than -1.0. StdAudio.play()
automatically clips the value to within the range 1.0 to
-1.0.
C. Checkpoint
Comment out all print statements in your loop when
testing Guitar. Because print statements
take time, they delay the computation of samples, and so
your speaker will not receive samples at the rate of
44,100 per second needed to make a meaningful sound.
Once you've completed Guitar, try playing this
familiar melody by pressing the keys below, pressing space
where S is denoted.
nn//SS/ ..,,mmn //..,,m //..,,m nn//SS/ ..,,mmn
Type the following into your guitar to get the beginning of Led Zeppelin's Stairway to Heaven. Multiple notes in a column are dyads and chords.
                                              w q q
        8       u       7       y             o p p
i p z v b z p b n z p n d [ i d z p i p z p i u i i
There are many ways to build
on Guitar.java. Some of these can earn extra
credit. Others cannot, but are included below for you to
implement if you are interested.
A. Extra Credit 1
Write a program VisualGuitar.java (by
modifying Guitar.java) that plots the sound
wave in real-time using PennDraw, as the user
is playing the keyboard guitar. The output could look
something like this, but change over time. You are free to
be as creative as you wish with your visualization, as
long as the visualization is driven by the sound samples
being emitted.
There are lots of different ways to visualize the sound,
and any kind of animation that is tied to the sound
samples is just fine. If you want to plot the sound wave
similar to the figure above, you'll find
the PennDraw.point()
and PennDraw.polyLine() functions useful,
although there are other options that also work fine.
If you draw lots of points, first
call PennDraw.setPenRadius(0) once. This
ensures that each point is a single pixel, and they will
draw faster. (This is not conceptually interesting; it's a performance
hack in the PennDraw implementation.)
Do not redraw the wave (or whatever animation you choose
to make) on every sample because PennDraw
will not be able to keep up. Instead, set a lower frame
rate, and draw a batch of samples at a time. (For
instance, you might set the frame rate to 44.1 and draw a
new image every 1000 sound samples.) Experiment with
different frame rates to find one that you think looks
good and draws smoothly. There is more than one way to
handle the drawing – there is no "right" way to do
this.
B. Extra Credit 2
Bring your laptop to recitation the week after this homework is due and perform a piece for your classmates. You may perform in groups if you wish, and you may use a modified version of your program for the performance if you wish.
C. Challenge for the bored
The ideas below are purely for you own enjoyment if you want to explore further. They are not worth any extra credit, and you will not submit them. They're just for fun.
Do not make these modifications in the version of
the RingBuffer.java, GuitarString.java,
or Guitar.java that you submit. Instead, make
new copies of these files with different names, and
experiment in your new files.
Modify the Karplus-Strong algorithm to synthesize a different instrument. Consider changing the excitation of the string (from white noise to something more structured) or changing the averaging formula (from the average of the first two samples to a more complicated rule) or anything else you might imagine. This is a challenge for the bored, so you will not receive extra credit for it, but you may use these suggestions as the basis for your visualization or your performance in class.
Alexander Strong suggests a few simple variants you can try:
- Stretched tuning – The frequency formula in the assignment uses "perfect tuning" that does not sound equally good in every key. Instead, most musicians use stretched tuning that equalizes the distortions across all keys. To get stretched tuning, using the formula f = 440 × 1.05956i - 24. Try experimenting a bit with the base of the exponent to see what sounds best.
- Extra notes – Add additional keys to your
keyboard string to play additional notes (higher or
lower). Higher notes, especially, will benefit from
stretched tuning. You will need to update the
24in your frequency formula to change the frequency of the lowest note. - Better decay factors – Make the decay factor dependent on the string frequency. Lower notes should have a higher decay factor; higher notes should have a smaller decay. Try different formulas and see what sounds best.
- Harp strings – Using a decay factor of
-0.997intic()will change the sound from guitar-like to harp-like. You may want to play with the decay factors and note frequencies to improve the realism. - Drums – Randomly flipping (with probability 0.5)
the sign of the new value before enqueueing it
in
tic()will produce a drum sound. You will need lower frequencies for the drums than for the guitar and guitar, and will want to use a decay factor of1.0(no decay). The note frequencies for the drums should also be spaced further apart. - Mix and match – Assign some keyboard keys to drums, others to guitar, and still others to guitar (or any other instruments you invent) so you can play an ensemble.
D. Enrichment
- Citation – The original paper describing this algorithm, including many variants and a mathematical derivation of why it works: Kevin Karplus, and Alexander Strong. "Digital Synthesis of Plucked-String and Drum Timbres". Computer Music Journal Vol. 7, No. 2 (Summer 1983), pp. 43-55. To access the full article, follow the link, then, click on "Login" in the upper right. Select "University of Pennsylvania" as your institution, and you will be able to log in with using your PennKey. (If you are on the Penn network, you may not need to log in.)
- ChucK – ChucK is a specialized programming language for real-time synthesis, composition, and performance, originated by Ge Wang and Perry Cook at Princeton University. Here's the Karplus-Strong algorithm in ChucK.
- Slide flute – Here is a description of a physically modeled slide flute by Perry Cook.
A. Readme
Complete readme_guitarhero.txt
in the same way that you have done for previous assignments.
B. Submission
Submit RingBuffer.java, RingBufferTest.java, GuitarString.java, Guitar.java,
and readme_guitarhero.txt on the course website.
You may also submit VisualGuitar.java for
Extra Credit 1. If your VisualGuitar program
requires any additional files, you may submit them in a
compressed file named extra.zip.
Your recitation TAs will arrange a time for you to complete Extra Credit 2.
You may not submit any modifications from the
"Challenge for the Bored" section in
the RingBuffer.java, GuitarString.java,
or Guitar.java files.