A. Goals
The goal of the Irate Avians assignment is to familiarize you
with arrays, iteration, graphics, and Java command-line arguments.
You will program this assignment in a bottom-up manner, assembling
different components in smaller Java programs before bringing them
all together in one final program, IrateAvians.java.
At the end of this assignment, you will have produced a game in
which players launch a bird projectile at various targets, and
try to hit all the targets while launching the bird as few times
as possible. We will use simple Eulerian physics to launch a
circular bird projectile into a 2D scene. Here is an example of
what your game might look like: 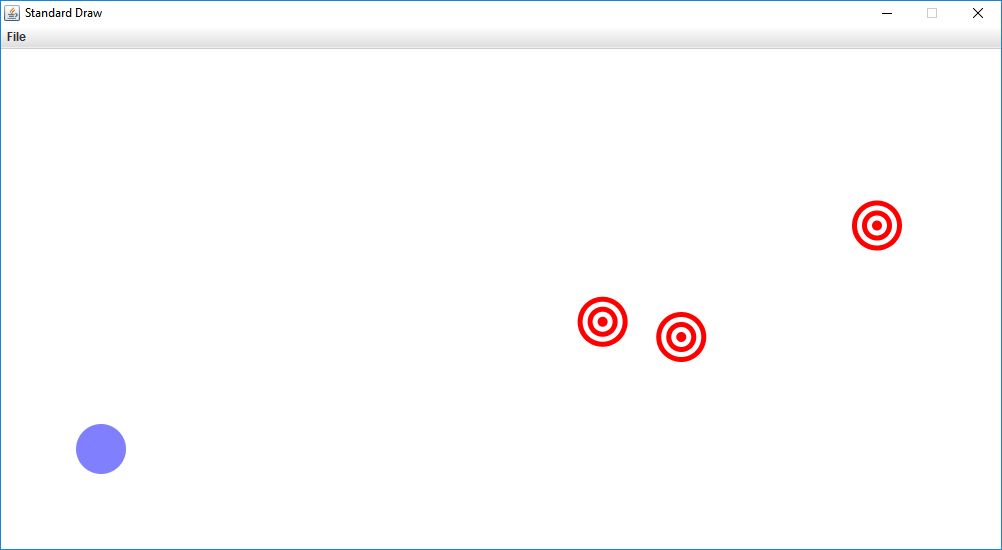
B. Getting Started
We have provided a .zip file containing a few Java files
containing little more than class declarations and comments
outlining what those classes should contain. You can download
the zip file here: FileReading.java.
A. Refresher: Using command-line arguments
Study the following program.
A Java program can take arguments when it is executed from the command-line at the
Interactions pane. These arguments are passed to the main() function as a
String array called args;
thus, the first command-line argument is args[0], the second is args[1],
and so on.
public class CommandLineArguments {
    public static void main(String[] args) {
        System.out.println(args.length);
        System.out.println(args[0]);
        System.out.println(Double.parseDouble(args[1]));
        System.out.println(Integer.parseInt(args[2]));
    }
}
Compile this program (you may cut and paste it into DrJava if you like) and run it by clicking Run on the toolbar. What happens?
Open the Interactions pane and enter these commands at the prompt:
- java CommandLineArguments eric 2.0 3
- java CommandLineArguments
- java CommandLineArguments eric
- java CommandLineArguments eric 2.0 3 adam
- java CommandLineArguments eric adam 3
- java CommandLineArguments eric 2 3
- java CommandLineArguments eric 2 3.0
Make sure you understand each line of code, and why you get the output and runtime errors that you do for each set of command-line arguments.
B. Setting up command-line arguments
Now that you’ve experimented with CommandLineArguments.java, open up FileReading.java and in its main method, have it take in a single command line argument: a String called filename that will represent the name of the file this Java program will read.
C. Checkpoint
CompileFileReading.java and run it with the argument targetFile1.txt. Your program should not crash; if it does, use System.out.println() to isolate and rectify the bug. Any debugging code that you add should be commented out when you submit.
A. Input file format
The specifications for the placement and sizes of the targets in the Irate Avians game will be provided in text files. By storing these specifications in separate files, our game can load a variety of different levels. You will be provided with text files in the following format:
3
1.5 2.0 0.25
1.0 3.0 0.1
3.0 1.5 0.5
In this file, the first line indicates how many targets will be in the level. All subsequent lines provide the x coordinate, y coordinate, and radius of one target. The number of lines following the first (which sets the number of targets) will equal the number stored at the first line.
B. Setting up In
The booksite’s standard library provides the file In.java to support reading from a file. Study StudentsFileProcessor.java, which is contained in the irateAvians.zip you downloaded in Part 0. It is an example of reading from a file. Compile StudentsFileProcessor.java, and run it from the DrJava Interactions Pane with the argument students.txt and see how it runs. In your FileReading class, declare and initialize a variable inStream as below:
In inStream = new In(filename); // creates a variable inStream to read from the file
C. Reading values from a file
Now that inStream is initialised, you can read from it using the
following function calls. These functions behave identically to those in StdIn.
boolean b = inStream.isEmpty();     // boolean value that is true if there are no more values, false otherwise
int     i = inStream.readInt();     // reads in an int from inStream
double  d = inStream.readDouble();  // reads in a double from inStream
boolean b = inStream.readBoolean(); // reads in a boolean from inStream
String  s = inStream.readString();  // reads in a string from inStream
String  s = inStream.readLine();    // reads in an entire line from inStream
String  s = inStream.readAll();     // reads in the entire file from inStream
inStream will start reading from the beginning of the file. Each time a function like
inStream.readDouble() is called, inStream
interprets the next number as a double (an error will occur if it cannot be parsed to a double).
The next time a read function is called, inStream moves to the next item in the file.
For example, say that a file, sample.txt, is as follows:
4 5
The code snippet
In inStream = new In("sample.txt");
int x = inStream.readInt();
double y = inStream.readDouble();
will set x to 4 and y to 5.0.
In your FileReading program, declare an integer variable numTargets. Using one of the above functions, assign numTargets the first value in the file.
D. Reading arrays from the file
Declare arrays of doubles named targetXs, targetYs, and targetRadii. Initialize their length using the numTargets variable. Use the inStream functions and a loop to read the values in a scene file. Since we know how many targets there are in the scene, we know how many times our loop should run.
E. Checkpoint
Copy the code below and paste it at the end of FileReading’s main method:
System.out.printf("%d\n", numTargets);
for (int i = 0; i < numTargets; i++) {
    System.out.printf("%f %f %f\n", targetXs[i], targetYs[i], targetRadii[i]);
}
Compile your program and run it again with the argument targetFile1.txt. Note that by pressing the up arrow key you can recall commands previously typed into the Interactions Pane. The output of your main method should exactly match the text in the file targetFile1.txt. If your program crashes or if the output is different, use System.out.println() statements to isolate and rectify the bug. Any debugging code that you add should be commented out (but not deleted) when you submit.
A. Examining the MousePressTesting.java
Open the provided file MousePressTesting.java. At present, it is a nearly-empty Java class, containing nothing more than a main method. We will add code to this main method so that the program draws a PennDraw canvas, and changes its color when the user presses or releases the mouse.
B. The neverending loop
Inside the main method, add the following statement:
while(true){
  PennDraw.clear(PennDraw.BOOK_RED);
}.
This loop will ensure that the program never terminates unless acted upon by an outside force (such as clicking the close button in the PennDraw window), and will continuously draw a dark red canvas. Now that we have this in place, we can add code to the loop to check for mouse input every time the loop iterates. Note that if we did not have this loop, and just had a single check for mouse input, then our program would run once (likely faster than human reaction time), checking for mouse input, then finishing the main method.
C. Check for mouse input
Take a look at PennDraw.clear is called, add an if statement that checks the return value of this method, and inside the body of that if statement, call PennDraw.clear(PennDraw.GREEN);. This will result in the PennDraw canvas being drawn as dark red when the mouse is not being pressed, and bright green when it is. However! Your screen will also have an unpleasant flickering effect when you hold down the mouse button. This is because your program has PennDraw update the canvas as fast as possible the while loop executes, and since the program colors the screen red initially and covers it up with green just afterward if the mouse is held you see the flickering between the two. To fix this problem, we will make use of PennDraw’s animation functionality, which forces PennDraw to wait to update your screen until you tell it to.
D. PennDraw's animation functionality
Just above the while loop, add the following line of code:
PennDraw.enableAnimation(60);
Additionally, at the very end of your while loop’s body, add this line of code:
PennDraw.advance();
These lines of code tell PennDraw to not update the appearance of the canvas until advance() is called, and to stall the program for enough milliseconds of real-world time such that the canvas is redrawn exactly sixty times per second. When you compile and run MousePressTesting now, your canvas should no longer flicker.
E. Getting additional mouse information
Finally, we will also display your mouse coordinates on screen whenever the mouse is pressed. Inside your if statement, just after the PennDraw.clear invocation, declare and instantiate two double-type variables called mouseX and mouseY. Given how we've named these variables, refer to the PennDraw wiki and determine which methods you should call to instantiate them. Then, add a line of code below these variables that calls the code
PennDraw.text(mouseX, mouseY, mouseX + “, “ + mouseY);
This will draw your mouse’s x and y coordinates just above the mouse cursor whenever you are pressing a mouse button.
F. Checkpoint
Make sure MousePressTesting compiles and runs properly. We will make use of this mouse tracking technique later on in the assignment in order to add a feature to the game that allows the player to click and drag to launch their bird projectile.
A. Overview
Now that we’ve made a few small practice programs, we will begin writing code that will form the basis of the Irate Avians game. Open GameLoopSkeleton.java and read over the provided code. You’ll notice it is very similar to the code you just wrote in MousePressTesting.java, except the while loop is not necessarily infinite. Rather, the main loop of the game will run so long as the win condition is not fulfilled, as tracked by the variable winConditionFulfilled. In GameLoopSkeleton, we will make a simple interactive application that creates a circular ball wherever the player clicks and haves it fall to the bottom of the screen, and sets winConditionFulfilled to true when the ball touches a circular target that the program randomly generates. This game will need to track what state it is in through a series of booleans and if-else statements; we will guide you through the process of setting these up in the steps below.
B. Defining different game states
Inside our main game loop, we will write an if-else statement that checks to see whether or not the game is in "mouse listening mode". When the game is in this mode, all it does is wait for the player to press a mouse button, and when the player does it will track their mouse position until the mouse button is released. After the mouse button is released, the game will exit the mouse-listening mode and transition into ball movement. To set up mouse-listening mode, add a boolean variable to your main method called mouseListeningMode, and set its starting value to true. Next, add an if statement inside your while loop that will execute only when mouseListeningMode is true. Additionally, place an else after your if to demarcate the body of code that will execute only once the game leaves mouse listening mode.
if(mouseListeningMode) {
  // The state in which the game begins.
  // Wait for the user to press a mouse button,
  // and draw a circle at the mouse position when they do.
}
else {
  // Update the circle’s position every time the while
  // loop iterates such that the circle falls downward
  // and eventually offscreen.
}
C. Mouse listening mode
We will now set up the functionality of mouse-listening mode. Within this mode, there are two states: before the user has pressed the mouse, and while the user is pressing the mouse. Before the user has pressed the mouse, the game will just display the base game screen and await the mouse press. After the user presses and holds the mouse, the game will draw a circle at the mouse’s position, letting the user drag it around. As in the last step, we will define these two states with an if statement. Create another boolean in your GameLoopSkeleton class called draggingCircle, initialize it to false, and set up an if-else statement nested inside the if statement you created in section B. Note the ! before draggingCircle:
if(!draggingCircle) {
  // Check if the user has pressed the mouse yet.
  // If so, set draggingCircle to true.
}
else {
  // If the user is currently pressing the mouse,
  // draw a circle of radius 0.1 at the mouse’s position.
  // You should store this radius in a variable at the
  // top of your main method, and name it circleRadius.
  // Store the mouse’s x and y coordinates in variables
  // called circleX and circleY at the top of the main
  // method so they can be updated outside this if statement.

  // If the user is NOT pressing the mouse, then they
  // have finished their click of the mouse button.
  // mouseListeningMode should be set to false, as the
  // game will transition into the state wherein the
  // circle falls downward (this state we have not yet coded).
}
D. Setting up circle dragging
Write code in the body of the if-else statement shown above so that it follows the functionality of the provided code comments. You should make use of the code you wrote in MousePressTesting to test whether a mouse button is being pressed, and to track the mouse’s position. One notable difference from MousePressTesting is that you should store the values of PennDraw.mouseX() and PennDraw.mouseY() in variables at the top of the main method called circleX and circleY. We do this so that we can update the circle’s coordinates after the user releases the mouse button.
E. Making the circle fall
We will now fill in the else portion of our mouse-listening mode conditional. This half of the if-else will run when the game has left mouse-listening mode and has entered the falling-circle mode. In this mode, we will draw the circle at its current X and Y coordinates, then update the Y coordinate so that it is a little bit farther down, causing the circle to fall over time as our while loop executes. Add code to update the circle’s Y coordinate so that it decreases by 0.02 units every time this else-statement executes within the while loop.
F. Making the game winnable
To practice making the game winnable, we will begin by testing for a different condition than the one described in the header comment of GameLoopSkeleton.java. In the else statement where the circle’s position is updated, we will now write code that checks if the circle is completely offscreen and sets winConditionFulfilled to true, causing our while loop to end. In order for the circle to be considered offscreen, its Y coordinate must be less than zero, and the distance from its center to the bottom screen edge must be greater than or equal to the circle’s radius. So, write an if statement that compares the distance between the circle’s Y coordinate and the bottom of the screen (which has a Y coordinate of zero). When this distance matches the criteria described, set winConditionFulfilled to true. Additionally, to make the game’s visual output show that you’ve won, add the following code after the body of your while loop.
PennDraw.clear();
PennDraw.text(0.5, 0.5, “You win!”);
PennDraw.advance();
G. Checkpoint
Compile and run GameLoopSkeleton. You should be able to click and drag a circle around the screen, and then when you let go of the mouse button the circle should drop to the bottom of the screen over time. When the circle is completely offscreen, the game should display a screen that says “You win!”.
H. Changing the win condition
Now that you can win the game, let’s change the win condition to make this practice program more similar to how your Irate Avians game will play. Now, the player will win the game by dropping the circle on top of a circular target. Add three variables to the top of your main method:
double targetX;
double targetY;
double targetRadius;
Now, add code after all of the if-else statements, but still within your while loop. This code will draw another circle at the location targetX, targetY with a radius of targetRadius. However, we still need to instantiate our target's attributes. At the beginning of your main method, use Math.random() to give targetX, targetY, and targetRadius random values. However, these values should be in the following ranges, rather than the plain [0, 1) that Math.random() gives you:
targetX: [0.2, 0.8)
targetY: [0.0, 0.4)
targetRadius: [0.05, 0.15)
In order to alter the results of Math.random() to the range you want, use the following formula:
desiredValue = Math.random() * (rangeHighValue - rangeLowValue) + rangeLowValue
Run your program a few times, and you should see the target appear at different locations with different sizes. Now that your target appears, set aside the code that sets winConditionFulfilled to true (but don't delete it!). Instead of changing winConditionFulfilled when the circle falls offscreen, write new code that changes it when the distance between the centers of the falling circle and target is less than or equal to the sum of the two circles' radii. You will need to use the Pythagorean Theorem to determine the distance between the circle's center and target's center. This will tell you when the two circles overlap. Once you've done this, run your program and try dropping your circle onto the target.
I. Resetting the game to mouse-listening mode
We will also write code lets the player play the game again if they miss the target with the ball, once the ball falls completely offscreen. Using the code you set aside in the last section, reset the value of mouseListeningMode to true when the ball falls offscreen, as well as the value of draggingCircle to false.
J. Checkpoint
You have now completed GameLoopSkeleton.java. Try play-testing your game a few times to make sure it works as described, debugging with print statements if not. Once you're done testing, move on to the final portion of this assignment: IrateAvians.java!
Congratulations! You've made it through coding all of the different components that will go into writing the game Irate Avians! In this section of the assignment writeup, we will take all of the code we’ve written previously and combine it all into the final product of this assignment.
A. Loading game levels
Using the code you wrote in FileReading.java, add code to IrateAvian's main method to read a text file and store its contents in arrays of target coordinates and radii. The arrays you use to store your target data should be declared at the beginning of your main method. Later on in the program, you will use this data to draw your targets as circles.
B. Setting up the main game loop
As in GameLoopSkeleton, set up a while loop that runs as long as a boolean winConditionFulfilled is false. This loop should also contain an if-else statement that splits the game into mouseListeningMode and a mode in which it computes the motion of a ball. For now, you can use the exact same structure in your mouse-listening mode as GameLoopSkeleton does, though we will rename some of the variables so they better describe the gameplay of Irate Avians. For now, leave the ball-movement mode blank.
C. Letting the player launch the bird-ball
We will adjust the code in the game's mouse listening mode to enable the player to click and drag to set an initial velocity for a bird-ball that begins at a fixed point, rather than dragging and dropping a ball. To begin, we will adjust the size and scale of PennDraw’s canvas. At the beginning of your main method, before the while loop, add the following code:
PennDraw.setCanvasSize(1000, 500);
PennDraw.setXscale(0.0, 10.0);
PennDraw.setYscale(0.0, 5.0);
This will make the game screen wider and will change the coordinate system from [0, 1] to [0, 10] on the X axis and [0, 5] on the Y axis. Additionally, add the following variables to the beginning of your main method:
double birdPosX; // Bird’s position X coordinate
double birdPosY; // Bird’s position Y coordinate
double birdVelX; // Bird’s velocityX coordinate
double birdVelY; // Bird’s velocity Y coordinate
double birdRadius; // Bird’s radius
These will represent the state of your bird, which includes a velocity in addition to a position and radius. Initialize birdPosX and birdPosY to 1.0, and birdVelX and birdVelY to 0.0. We will also set birdRadius to 0.25.
Now we will alter the functionality in the portion of the code that handles mouse dragging. Instead of setting the bird-ball's position to the mouse’s position when a mouse button is held, we will set the bird's initial velocity based on the mouse’s position relative to the bird. When the mouse is pressed, set the velocity variables based on this formula:
birdVelX = birdPosX - mouseX;
birdVelY = birdPosY - mouseY;
We will also draw a line to visualize this initial velocity. After you compute the velocity, add code that calls PennDraw.line and provides it with the bird's current position as one endpoint, and the bird’s position plus its initial velocity as the second point. This will draw a line extending from the bird in the direction that the bird will move after the mouse button is released, once we code the bird's physics in a section below.
D. Bird Physics
We will now fill in the body of the else statement that follows our if statement that checks whether or not the game is in what was called circle-dragging mode in GameLoopSkeleton. Similarly to how you updated the circle’s Y coordinate in GameLoopSkeleton, you will update the bird-ball's X and Y coordinates. First, add a variable to your main method called TIME_STEP, make it of type final double, and initialize it to 0.2. This will be used as part of the physics equation we’ll code to update the bird’s position and velocity. Update the bird’s position variables like so:
birdPos = birdPos + birdVel * TIME_STEP;
Additionally, update the bird's Y velocity by subtracting 0.05 from it. This will cause the bird-ball to fall over time as it moves forward.
E. Drawing the bird and targets
As in GameLoopSkeleon, add code to draw your bird and targets after all the if-else statements but before the while loop ends. The bird should be drawn as a filled circle of a color of your choosing, and the targets should be drawn as filled circles in a color distinct from the bird's. Don't forget to call PennDraw.advance() after all your other PennDraw calls, and be sure to call PennDraw.enableAnimation(30) at the beginning of your main method, if you haven't already. This will have your game run at 30 frames per second.
F. Updating the win condition
After you update the bird's position and velocity, you should check to see if it is currently overlapping any of the targets you loaded into the program with your file reader. In order to save which of the targets the bird has already hit, add an array of booleans named targetsHit and have it store one boolean per target. Make sure you declare this array at the beginning of main with the rest of your target arrays. If the bird-ball overlaps a particular target, set that target’s corresponding boolean to true. Use the same logic as you did in GameLoopSkeleton to check whether two circles are overlapping, but only check the bird-ball against targets that have not yet been hit; use an if-statement inside your loop that iterates over the targets to skip over any already-hit targets. Additionally, update your target-drawing code so that it only draws targets that have not yet been hit by the bird-ball.
The player wins the game when every target has been hit. After you check the bird-ball's overlap with each target, run another loop over the targetsHit array. If every element inside the array is true, then you should set winConditionFulfilled to true. As in GameLoopSkeleton, the outermost while loop should end and the game should display a "You Win!" screen.
G. Giving the player multiple bird launches
Right now, the game will run forever in an unplayable state after the player launches the bird-ball, provided not all of the targets were hit. We want to put the game back into mouse-listening mode when the bird-ball leaves the screen. Similarly to GameLoopSkeleton, add code to your bird physics section that checks the bird's X and Y position plus radius and sees if the bird is entirely offscreen relative to any of the four screen edges. If this is the case, the bird's velocity should be reset to 0, its position should be reset to (1,1), mouseListeningMode should be set back to true, and draggingCircle should be set back to false.
Implement any of these features to earn extra points!
Sound Effects (1 point)
Using StdAudio.java, add sound effects to the game. A sound should play when the player launches the bird, when a target is hit, when the bird resets to its original position, and when the player wins the game. StdAudio requires .wav files; you can find its documentation
Detailed Drawing (2 points)
Draw the bird and targets with more detail than just a plain PennDraw circle, using additional PennDraw shapes. Using images alone in place of circles will not count for extra credit.
Bouncing Bird (3 points)
Have the bird-ball bounce off of targets rather than moving through them. This will require you to reflect the bird's velocity about the vector between the target's center and the bird's center. Feel free to look up how to reflect one vector about another.
Force Fields (4 points)
Using PennDraw’s keyboard input capabilities, allow the user to hold the I or O key while clicking to place a force field that either pulls the bird-ball in (I) or pushes it out (O). The bird’s initial velocity should only be updated while the mouse is held when no keyboard key is pressed. Likewise, the user should be able to press the R key to reset the game to mouseListeningMode and reset the bird, should it get caught in the force fields. You should represent force fields as small PennDraw circles; orange for pull-fields and purple for push-fields.
A. Readme
Make sure to fill out the readme provided with the base code before you submit!
B. Submission
Important: Please use Gradescope to submit hw02.
You need to upload FileReading.java, MousePressTesting.java, GameLoopSkeleton.java, IrateAvians.java,
and readme_avians.txt. Remember that your filenames should match the required
names exactly, including capitalization.
Make sure you submit the .java files, NOT
the .class files.
If you used images for any of your drawing, you'll need to submit those image files as well in order for your program to run correctly.