A. Goals
The purpose of the Encryption assignments is to gain practice with object-oriented programming, bitwise operators, number systems, and machine language. The specific goals of Part I are to:
- continue to familiarize yourself with objects in Java
- gain an understanding of interfaces
- implement practical examples of bits and bitwise functions
- get a glimpse into the world of cyber security
At the end of this assignment, you will have produced a Java library that encrypts text and images using a linear feedback shift register.
B. Mid-Semester Evaluation
Every semester, we ask students to fill out
a
C. Background
Encryption is a process of converting a message, image, or any other form of data into encoded data that can only be decoded by someone who can decrypt the message (usually with a passkey or the like). A good encryption algorithm should produce output that looks random to a bystander but is easily decipherable with the correct passkey. Thus, encryption algorithms make use of pseudo-random encryption keys.
In this assignment, you will implement and use a linear feedback shift register (LFSR) to create pseudo-random bits. You will be using your LFSR to encrypt images and text so that they cannot be decrypted without knowing the parameters of the LFSR used to generate the encrypted message.
To encrypt the message, each bit in the message will be
XORed by a sequence of pseudo-random bits produced by the
LFSR. The resulting cipher, or encoded message, will
appear to be nonsense, like "Kao y{u(x kp
}`1rkz~|g2rj`f@r)", but when it is XORed by the
same sequence of pseudo-random integers, the
encrypted message will be decrypted into the
original. Since an LFSR is completely determined by its
two parameters, the recipient of the message will need to
know the parameters used by the sender's LFSR to decrypt
the message. For this reason, an LFSR encryption scheme is
a symmetric key encryption technique. (The
alternative is an asymmetric scheme, in which
different passwords are used for encrypting and
decrypting. The most famous asymmetric encryption method
is the RSA algorithm.)
D. Your Program
In Part I of the Encryption assignment, you will write a linear-feedback shift register (LFSR) class in Java, and use this class to create libraries to encrypt text and images. These are the classes and interfaces involved in this assignment:
LFSRis a class that provides pseudo-random bits given a seed and a tap valueEncryptableis an interface that represents a data type that can be subject to encryption by a bitwise encryption scheme, exposing the individual bits of the dataStringEncryptableis a class that exposes the individual bits of a piece of textEncrypterprovides utility functions to encrypt anyEncryptabledata type using anLFSR.PictureEncryptableis a class that exposes the individual bits of an image file
main() – As with the
CIS 110 libraries you implement, you should test all
aspects of each class you implement in
the main() method, documenting in comments
how to run the tests that you write.
E. Getting started
- Download
LFSR.java,Encryptable.java,PictureEncryptable.java,StringEncryptable.java, andEncrypter.java. - Before you make any changes to any of these files, make sure that they compile correctly.
- Add a file header to each file.
- Review the class material and textbook chapters on the
following topics:
- The binary number system
- Bitwise operators
- Objects and classes
This assignment was developed by Max Tromanhauser, Scott Wang, and Benedict Brown, based on an assignment created by Robert Sedgewick.
LFSR
A. The concept of the linear feedback shift register
In the first part of this assignment, you will be creating a linear feedback shift register (LFSR). An LFSR is a structure that can produce a stream of pseudo-random bits, which has many practical uses, particularly in cryptography (which is the application that you will implement in the later sections of the assignment).
The LFSR consists of a register of bits and a tap position. The register is simply a list of bits that has a fixed size (which should suggest to you a good data structure to implement it). The tap position is simply an index in the register that will be used to create the pseudo-random bits. When we create an LFSR, we must seed it by providing the initial values in the register.
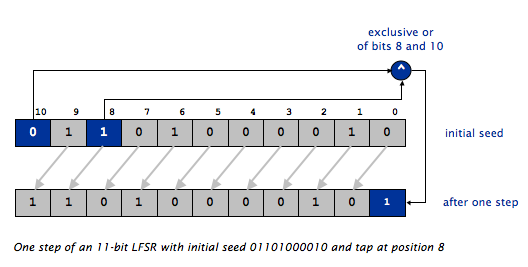
There are two steps in producing a pseudo-random bit with an LFSR:
- Shift all bits by one place towards the most significant bit (towards the left in the diagram).
- Replace the least significant bit (the rightmost bit) with the exclusive or of the most significant bit that was shifted off and the bit previously in the tap position.
The new least significant bit will be the pseudo-random bit produced by the LFSR.
Consider an example. The following figure shows an LFSR
seeded with the initial seed 01101000010 and
tap position 8 during the process of
producing one pseudo-random bit. Keep in mind
that the tap position is counted from the rightmost
(least significant) bit! This is opposite from the
way positions are counted in arrays and strings, but is
consistent with the way bit/digit positions are counted in
numbers.
B. The LFSR class
Your LFSR class will implement the API
below. As always, you are free to add any additional
methods and/or instance variables you need, as long as
they are private and properly commented.
public class LFSR
-----------------
LFSR(String seed, int tapPosition)    // create an LFSR seeded with the given seed and tapPosition
LFSR(int seedLength, int tapPosition) // create an LFSR seeded with a random seed of length seedLength and a given tapPosition
String getShiftRegisterContents()     // return the current bit sequence in the shift register as a String of 0s and 1s
int    getTapPosition()               // return the tap position
int    nextBit()                      // advance the LFSR by one step and return the next pseudo-random bit
C. Instance variables
We are leaving it up to you to decide how to represent the shift register within the LFSR object. Here are some suggestions:
- an
int[]containing only1s and0s; - a
char[]containing only'1's and'0's; - a
boolean[]containing onlytrueandfalse; - a single
int, where each bit represents a position in the shift register. This is a more challenging implementation, but will give you a head start on the next assignment. In this case, your shift register will be limited to 32 bits, and you will need to use the bitwise operators&(bitwise AND),|(bitwise OR),<<(shift right), and>>(shift left).
D. Constructors
LFSR(String seed, int
            tapPosition)
takes a String
parameter seed whose characters are a
sequence of 0s and 1s, as well
as an int parameter tapPosition.
The shift register is initialized to the sequence
of 0s and 1s
in seed; the length of the shift register is
the length of seed. You will find
the String.length()
and String.charAt() methods helpful for
converting seed to the internal
representation you are using. This constructor should
throw a RuntimeException with a useful error
message if seed contains anything other
than 0 or 1, if
tapPosition is impossible for the length
of seed, or if seed
is null. (Copy the syntax for this from
your RingBuffer.java.)
LFSR(int seedLength, int
            tapPosition)
initializes the shift
register to a random sequence of
length seedLength. Each bit in the shift
register should be 0 or 1 with
equal probability. This constructor should also throw
an RuntimeException for impossible values
of seedLength and tapPosition.
Avoid duplicating code from your first constructor.
(Hint: consider adding some private methods
to LFSR.)
Required Testing: Add a main
function to your class, and add code to test each
constructor using both a variety of valid arguments and
also different types of invalid arguments. You may write
these tests however you like, but if they depend on
command-line arguments you must add comments that explain
exactly which tests you ran to test different cases.
Comment out any tests of invalid arguments that cause your
program to crash (like it is supposed to), but do not
delete them. Do not comment out test code
in main unless it is supposed to crash
your program.
Submit your code to see whether your code passes our tests, similar to the setup on the Cheat Checker assignment. Be aware that our tests are not necessarily exhaustive.
E. Methods
getShiftRegisterContents()
returns the current bit sequence in LFSR's shift register
as a string of 1s and 0s. For
example,
LFSR lfsr = new LFSR("01101010", 5);
System.out.println(lfsr.getShiftRegisterContents());
should print 01101010.
Required Testing: Add code to test
to main
test getShiftRegisterContents. Once the
method passes your own tests, submit and make sure it
passes our tests as well.
getTapPosition() returns
the position of the tap bit.
Required Testing: Add code to test
to main
test getTapPosition. Once the
method passes your own tests, submit and make sure it
passes our tests as well.
nextBit() performs one step
of the LFSR, as described above, and returns the least
significant bit (the rightmost bit) in the shift register
as an int with the value 0
or 1. The new least significant bit should be
the XOR of the most significant bit (the leftmost
bit) in the shift register and the bit in the tap
position. This will create a pseudo-random bit. For
example,
LFSR lfsr = new LFSR("01101000010", 8);
for (int i = 0; i < 10; i++) {
    int bit = lfsr.nextBit();
    System.out.println(lfsr.getShiftRegisterContents() + " " + bit);
}
should print
11010000101 1
10100001011 1
01000010110 0
10000101100 0
00001011001 1
00010110010 0
00101100100 0
01011001001 1
10110010010 0
01100100100 0
Required Testing: Add code to test
to main test nextBit. If you
use command-line arguments to test different cases, make
sure to include comments that document what tests you ran.
Your tests should include a mix of call
to nextBit(), getShiftRegisterContents(),
and getTapPosition(). This is important to
test the interaction between the methods, but will happen
naturally in this case:
calling getShiftRegisterContesnts()
and getTapPosition() will be the easiest way
to access your seed and tap after each call
to nextBit() so you can verify the
computations by hand.
StringEncryptable
A. The Encryptable interface
We provide an interface, Encryptable, that
represents a class that can be encrypted using your
implementation of LFSR. Aan interface is
just a mechanism to tell Java that your class provides a
particular API. So a class that implements
the Encryptable interface must contain all
the methods listed in the interface or it will not
compile.
public interface Encryptable
----------------------------
boolean hasNextBit()                  // return whether there are more bits to be encrypted
void    encryptNextBit(int randomBit) // encrypt the next bit by XORing with randomBit
Since your LFSR implementation operates on individual
bits of data, a client of your LFSR needs to provide a way
of reading and writing each bit in the data in
sequence. The Encryptable interface provides
methods that allows the data to be treated as a stream of
bits that can be encrypted. Do not start writing
these methods yet. You will do that in Part D
below.
hasNextBit()
returns false if there do not exist any more
bits to be encrypted in the data; otherwise, it
returns true.
encryptNextBit(int
            randomBit)
encrypts the next bit in the
data by XORing it
with randomBit, unless there
are no further bits to encrypt, in which case it throws
a RuntimeException.
It is up to any class that implements
the Encryptable interface to keep track of
which bit to encrypt next using private
instance variables.
In addition, classes implementing
the Encryptable will typically include
additional public methods to access the
underlying data as well as appropriate constructors.
B. The StringEncryptable class
The StringEncryptable class represents a String that provides access to the individual bits of data within each character. The class must implement the Encryptable interface. It has the following API.
public class StringEncryptable implements Encryptable
-----------------------------------------------------
StringEncryptable(String message) // create a new Encryptable with the given text message
String toString()                 // return the encrypted message
Reminder –
Since StringEncryptable implements
the Encryptable interface, it also must
implement the methods of Encryptable.
To simplify the assignment, messages are limited to upper-case letters, numbers, and most standard punctuation marks. There are exactly 64 characters allowed, which conveniently requires exactly 6 bits to encode. In addition, the characters we chose can all be typed on a standard US keyboard, and can all be displayed using any font. (If we allowed messages to contain any character, encrypted messages would end up being mostly Chinese characters and unprintable characters; exchanging encoded messages would then be very difficult for many of you.) The exact list of allowed characters is:
!{#$%&}()*+,-./0123456789:;<=>?@ABCDEFGHIJKLMNOPQRSTUVWXYZ[~]^_`
The set of characters we chose to allow is the range of
characters with ASCII codes 33 – 96,
except that we have
replaced ", ',
and \ with {, },
and ~ so you can cut and paste encoded
messages from piazza with no
trouble. ", '
and \ are both treated specially by DrJava's
interactions pane and would cause unnecessary grief.
You don't have to do this conversion yourself!
We have included two functions in
the StringEncryptable.java skeleton code to
convert between String and int
arrays in which every value is between 0 and 63:
stringToIntArray(String s)converts a string to uppercase, replaces all spaces, newlines and tabs with_characters, makes sure all characters are in the allowed list, then maps the converted string to an array of integers. This way you safely encrypt messages containing lower-case letters and spaces as well.intArrayToString(int[] intArray)converts an array of integers back to a string.
C. Instance variables
Your StringEncryptable class will need to
maintain at least the following data in instance
variables:
- The underlying
int[]array of six-bit character values returned by thestringToIntArray()function - The index of the next character to be encrypted
- The next bit position within the character to be encrypted
D. Constructor
StringEncryptable(String
            message)
should prepare to
encrypt message, starting with the
most-significant bit (bit 5, since each character is
represented by six bits) of the first character (character
0). If message is null it
should throw a RuntimeException.
Required Testing: Add a main
function to your class, and some tests for your
constructor, including valid and null
strings. Verify that the program does/does not crash when
the constructor arguments are valid/invalid. Make sure to
add comments describing exactly what tests you ran using
command-line arguments. Also make sure to comment out any
tests that will (intentionally) cause your program to
crash. Then submit, and make sure all our submission
tests pass.
Messages containg space characters: If you want to pass a message containing spaces as a command-line argument, just enclose the entire message in quotation marks like this:
> java StringEncrypter "This is a message containing spaces."
The entire string contained in quotes will
become args[0]. Remember
that stringToIntArray() will convert the
spaces to _ characters, so the encrypted (or
decrypted) message will never contain spaces. This will
make it a bit simpler to exchange encrypted messages with
other students.
E. Methods
toString() returns the
output String in its current state of
encryption. If half the bits have been encrypted so far,
the first half of the output should be encrypted.
Required Testing: Add code to main to print the
object you created when you tested the
constructor. toString() is special in Java:
whenever you use an object in a situation where Java
expects a String it will automatically
call toString(). So you can just add code
like this (replace the variable name with whatever name
you chose):
System.out.println(yourStringEncryptableObject); // Java automatically calls toString()!
When your own tests work, submit and make sure our tests pass as well.
hasNextBit()
returns false if there do not exist any more
bits to be encrypted in the data, i.e. if the least
significant bit of the last character in the
input String has been encrypted.
encryptNextBit(int
            randomBit)
encrypts the next bit if
there are further bits to encrypt. You
should encrypt starting with the most significant bit of
the first character, proceeding bit-by-bit down the
least-significant bit of the first character, then moving
on the most-significant bit of the second character.
- You must use bitwse operators to encrypt each bit.
You may not use
Integer.toBinaryString()or any similar function. (Note: you may use this function in debugging code that you comment out before submission.) - Recall that, to access and modify individual bits of
an
int, you need to use the lef shift (<<) and bitwse XOR (^) operators. For example, to encrypt bit 3 of an integervalusing the bitb, you need to XORvalwith an expression that is 0 except for bit 3 (so only bit 3 will be affected); bit 3 needs to be set tob. The following statement does exactly that:val = val ^ (b << 3);
- If there are no further bits to encrypt, then this method
throws a
RuntimeException.
Required Testing: Add code to main
to test hasNextBit()
and encryptNextBit(). You should be able to
call encryptNextBit() exactly six times the
number of characters in your message
before hasNextBit()
returns false. The next time you call it,
your program should crash with
a RuntimeException. Once you pass your own
tests, submit and make sure you pass our tests as
well.
- One way to test that
encryptNextBit()is doing the right thing is to work with classmates to design test cases that you will all try. (Document this in your help log, of course.) If your implementations all agree, there is a reasonable chance they are all correct. It's best to test with classmates that you have not discussed the assignment at all with earlier, to reduce the chances that you all have the same bug. - If you always pass
0as therandomBitparameter toencryptNextBit(), the "encrypted" string should match the input, since no bits should have been flipped. - Here are a couple of specific strings and sequences of
"random bits", along with the encrypted string they should
generate:
- String is
ABCD, "random bits" are111111111111111111111111(always 1): "encrypted" string is@?>= - String is
ABCD, "random bits" are101010101010101010101010(alternating1s and0s): "encrypted" string is+,)*
- String is
- If you want to encrypt a string, and immediately
decrypt it in your
mainfor testing, you will need to calltoString()on the fully encryptedStringEncryptableobject, and create a newStringEncryptableto handle the decryption. There is no way to "rewind" the next bit to encrypt in your original object to the beginning.
Encrypter
A. The Encrypter class
In this section, you will
write Encrypter.java. This is a library
class: it contains only static functions for encrypting
and decrypting:
public class Encrypter
----------------------
static void encrypt(Encryptable data, LFSR lfsr) // encrypt the given Encryptable using the given LFSR
static void decrypt(Encryptable data, LFSR lfsr) // decrypt the given Encryptable using the given LFSR
encrypt(Encryptable data, LFSR
            lfsr)
take as parameters
an Encryptable object to be encrypted and
an LFSR object that will produce the
pseudo-random int values used when
encrypting. Obtain the next bit of the LFSR and encrypt
the next bit in data until there are no
longer any bits to be encrypted. Throw
a RuntimeException if
either data or lfsr
is null.
decrypt(Encryptable data, LFSR
            lfsr)
follows the same process of XORing
as encrypt. Throw
a RuntimeException if
either data or lfsr
is null. Be sure not to repeat code between
these two functions: you should be able to
implement decrypt in a single line.
Remember that any class that
implements Encryptable counts as
an Encryptable object. So both these
functions will be able to take
the StringEncryptable objects you just wrote.
In the next tab you will implement
the PictureEncryptable class. Then you'll be
able to encrypt pictures without
changing Encryptable at all. This works
because they can only use methods defined in
the Encryptable interface.. Methods that
are part of StringEncryptable
or PictureEncryptable only will cause
compiler errors.
Required Testing:
- Add a
mainfunction to your class that creates aStringEncryptableobject and an LFSR object based on a seed and tap specified at the command line. It should callencrypt()to encrypt the message, and print the result. Then it should create a new a newStringEncryptableobject using the encrypted message and the original seed and tap, and calldecyrpt(). Print out the result, which should match your original message. - Test with a variety of messages, seeds, and taps. Add comments that list which test cases you have run.
- When you encrypt the
string
ARVIND_IS_AWESOMEwith the seed01101000010and tap position8, you should get the encrypted message3C$2X;=8A[5:I64=R. - Make sure to test "problem" cases,
including
nullStringEncryptableandLFSRobjects, invalid message tests, invalid seed and/or tap, and combinations of the above. Some of these you can do using command-line arguments (add comments to explain which tests you ran!), and some may require extra code inmain(comment this extra code out once you're done testing, so your test code doesn't crash). - Compare your encrypted messages to the output from classmates to make sure they match. Make sure you can decrypt each other's messages.
- PIAZZA TESTING! Post at least one encrypted message to piazza in the secret_messages folder, along with the appropriate seed and tap, for another student to decrypt. Decrypt a message that another student has posted to piazza, and post a follow-up with your answer. (Please only post a follow-up to one correctly encrypted secret message, so everyone gets the opportunity to decrypt something.) In your readme file, you will record the message number of at least one secret message you posted, and the secret message you decrypted. Your TAs will verify these posts during grading.
PictureEncryptableA. The PictureEncryptable class
The PictureEncryptable class represents an
image that provides access to the individual bits of data
in the image. This class must implement
the Encryptable interface as well as the
extra methods listed below.
public class PictureEncryptable implements Encryptable
------------------------------------------------------
PictureEncryptable(String filename) // create a new Encryptable with the given image
PictureEncryptable(Picture pic)     // create a new Encryptable with a copy of the given Picture
Picture getPicture()                // return the Picture in its current state of encryption
Reminder –
Since PictureEncryptable implements
the Encryptable interface, it also must
implement the methods of Encryptable.
The textbook's standard library, which was installed by
the introcs installer you ran in Homework 0, provides
a Picture class. The API documentation
for Picture
is here. This
class is very handy for loading and displaying pictures,
but very clunky for manipulating the individual pixels.
We therefore recommend that your implementation store
the image as a 2-D array of ints, which are
much easier to work with. The skeleton code we provide
you includes methods to convert
between Pictures and 2-D int
arrays for you:
pictureToIntArray(Picture pic)intArrayToPicture(int[][] intArray)
Your PictureEncryptable implementation
should encrypt the bits starting with the pixel in row 0,
column 0 (upper-left corner), and moving row-by-row.
(When half the bits have been encrypted, as shown at the
bottom of the page.) Within each pixel, start with the
most-significant/leftmost bit (bit 31), and work your way
down to the least-significant/rightmost bit (bit 0).
 |  |
|
| Famous pipe painting by René Magritte | Painting encrypted with
seed 01101000010100010000 and
tap 16 |
B. Instance variables
Your PictureEncryptable class will need to
maintain at least the following data in instance
variables:
- The underlying 2-D
intarray of pixel values - The position of the next pixel to be encrypted
- The next bit position within the pixel to be encrypted
C. Constructor
PictureEncryptable(String
            filename)
should load the
picture filename and prepare to encrypt
it. You can load a picture easily with the
textbook's Picture class:
Picture p = new Picture(filename);The first pixel to be encrypted is at (0, 0), and the most significant bit is encrypted first. You do not need to do any error checking in this constructor, because the
Picture class throws its own exceptions
if filename is not a valid image.
PictureEncryptable(Picture
            pic)
should prepare to encrypt the
picture pic. Throw
a RuntimeException if pic
is null. Your class must not
modify pic in any way.
Required Testing: None. Add a main
function to your class, and some tests for both
constructors, including valid and invalid image names, and
constructing with a null picture object.
You'll only be able to verify that the program does/does
not crash when the constructor arguments are
valid/invalid, but this is worth doing. Make sure to add
comments describing exactly what tests you ran using
command-line arguments. Also make sure to comment out any
tests that will (intentionally) cause your program to
crash. Then submit, and make sure all our submission
tests pass.
D. Methods
hasNextBit()
returns false if there do not exist any more
bits to be encrypted in the data, i.e. if the least
significant bit of the bottom right pixel's color value
has been encrypted. Otherwise, it
returns true.
encryptNextBit(int
            randomBit)
encrypts the next bit if
there are further bits to encrypt.
- As described above, the order of encryption is left-to-right, top-to-bottom, starting with the most significant bit in each pixel, and working down to the least significant bit.
- You will need to use bitwise operators just like
in
StringEncryption. - If there are no further bits to encrypt, then this
method should throw a
RuntimeException.
Required Testing: Add code to main
to test hasNextBit()
and encryptNextBit(). To do this you'll need
to get the width and height of your image, which you can
do this way (you will need to adjust the variable names to
match the choices you made in your own code):
int numRows = testPictureEncryptableObject.intArray.length;    // number of rows (height)
int numCols = testPictureEncryptableObject.intArray[0].length; // number of columns (width)
int numBitsToEncrypt = 32 * numRows * numCols;
you should be able to call encryptNextBit()
exactly numBitsToEncrypt times
before hasNextBit() returns false.
The next time you call it, your program should crash with
a RuntimeException. Once you pass your own
tests, submit and make sure you pass our tests as well.
getPicture() returns
a Picture object with the image in its
current state of encryption. If you have encrypted half
the bits so far, only the top half of the image should be
encrypted.
Required Testing: The easiest way to
test getPicture() is by invoking
the show() method on the picture it returns, e.g.:
testPictureEncryptableObject.getPicture().show();
You should also test the interaction of your different methods. The easiest way to do this is to
- Create a
PictureEncryptableobject, callgetPicture()and show the image it returns (which should be the original image). - Call
encryptNextBit()enough times to encrypt half the image, always passing1as therandomBitargument. - Call
getPicture()again and show the result. The top half of the image should look extremely bizarre, while the bottom half looks unchanged (see below). - Encrypt the rest of the image (still
using
1as your random bit). CallgetPicture()and save the result to aPictureobject. - Show the result (the entire image should look bizarre now: see below).
- Create another
PictureEncryptableusing thePictureobject you just saved to a variable. Repeat all the steps above on your newPictureEncryptable. This time, the initial picture should be the bizarre one. After "encrypting" half the bits, the top half should look normal, while the bottom half still looks bizarre. After "encrypting" the entire picture, it should once again look completely normal. - Add code that calls
Encrypter.encrypt()andEncrypter.decrypt()to encrypt and decrypt your image. The encrypted image should look like garbage, and the decrypted version should look normal. Moreover, you should be able to save the encrypted image (when you show the picture there is aFile|Savemenu) as a .PNG file, and your classmates should be able to decrypt it with their own implementations (and vice versa). WARNING: DO NOT SAVE YOUR ENCRYPTED IMAGES AS .JPG FILES! JPEG files are smaller than PNG files because they discard information that is hard for humans to see. This necessarily changes the bits in the image, which means it will never decrypt properly. - Save the encrypted pipe image from the top of this page. Decrypt it (or encrypt it: it shouldn't matter) using the seed and tap in its caption. You should get the original pipe image out.
|  |  |  |  |
|||||
| Original Image | Half Encrypted | Fully Encrypted | Half Decrypted | Fully Decrypted | |||||
The pipe images in different stages of
encryption/decryption when randomBit is
always 1. |
|||||||||
Note: This extra credit is longer and more challenging than most. It will be worth somewhat more than previous extra credits, but not in proportion to its length. (Besides, the impact of extra credit is always limited.) You should do this because it's fun (which it is).
Background: Image Steganography
Image steganography is the science of hiding secret messages inside of images. Think of it as 21st century disappearing ink. The casual observer simply sees an ordinary image; only someone who knows how to look for it will notice or find the message.
Steganography and encryption are complementary. Steganography is about secretly sending messages, so others don't know you are communicating. Encryption is about sending secret messages, so anybody who finds out your are communicating can't understand what you are saying. You can also combine the two to secretly send secret messages: just encrypt your message before hiding it in the image!
You will implement a simple, but very effective form of image steganography. The idea is to fiddle with each pixel's color in a way that isn't perceivable to the human eye, but that the computer can interpret. Since the human eye is least sensitive to blue wavelengths, you will slightly adjust the amount of blue in each pixel in a way that encodes a single bit of information. Specifically, you will replace the least-significant bit of each blue value with one bit of the message.
Extra Functions in PictureEncryptable
You will add the following four public
static functions to
your PictureEncryptable class, mainly because
that way the functions can
use pictureToIntArray
and intArrayToPicture:
public static Picture hideMessage(String filename, String message); // embed message in picture filename public static Picture hideMessage(Picture pic, String message); // embed message in picture pic public static String retrieveMessage(String filename); // retrieve the message in picture filename public static String retrieveMessage(Picture pic); // retrieve the message in picture pic
Encoding the message
The secret message should consist only of ASCII
characters (characters whose codes are between 1 and 127
on the ASCII/Unicode chart), which includes all standard,
English characters and punctuation, but no accented
characters or Chinese. Unlike
in StringEncryptable, you should not
map these to another representation. Instead, the bit
sequence to represent each character will simply be
the last 7 bits of the character code returned by
the charAt() method. In short, don't do
anything special to the message's characters: just use the
last 7 bits of Java's standard character codes.
To signal the end of the message (which may not use up
all the pixels in the image), you must add the NULL
character (character code 0) to the end of the message
string before hiding it in the image. The character
literal for the NULL character is '\0'. The
string literal for a string containing only the NULL
character is "\0". (This is called a
"NULL-terminated string," and is a standard convention for
indicating the end of a string. It's the way the C
language represents strings.)
hideMessage
Write two versions of hideMessage, one that
takes the filename of a picture, and the other that takes
a Picture object. Do not duplicate code
between the two. The functions should
call pictureToIntArray(), the use bitwise
operators to replace the least significant bit of each
integer (which happens to be the least significant bit of
the blue value) with one bit of the message. It will take
7 pixels to encode a single character. Work
left-to-right, top-to-bottom through the image, just like
you did for encrypting the image. And encode each
character starting with the most significant bit and
working toward the least signficant bit, just like you did
for encrypting strings. Return a Picture
object containing the image with embedded message. Since
this is extra credit, you don't have to add error checking
(you do need to add comments though!), but we encourage
you to do so. You also don't have to add any specific
testing code to main, although you probably
will want to.
retriveMessage
Write two versions of retrieveMessage, one
that take the filename of a picture containing an embedded
message, and the other that takes a Picture
object containing an embedded message. Do not duplicate
code between the two. In both cases, you need to extract
the hidden message from the image, not including the
terminating NULL character, and return it. Again, you
have to comment your code, but you don't have to do any
specific error checking.
The image below has a secret message embedded in it.
It's not encrypted, so you should be able to extract it
once retrieveMessage is working properly.
A. Readme
Complete readme_encryption.txt
in the same way that you have done for previous assignments.
B. Submission
Submit LFSR.java, PictureEncryptable.java, StringEncryptable.java, Encrypter.java, and readme_encryption.txt on the course website.
C. Mid-Semester Evaluation
If you have not yet filled out
the