Important files: Because Mac and Windows machines seem to get upset when downloading files with weird file extensions (e.g., .asm), we've included all the files you will need to get started in one zip file, hw7.zip.
History: Breakout is an old, old game. You probably saw it with other names like Arkanoid, but the basic idea is the same. You have a paddle at the bottom of the screen which you can move left and right, and a ball that flies around the screen. When the ball hits a brick, it will make the brick disappear. If the ball hits a wall or a paddle, it will just bounce off harmlessly. You lose, however, if the ball hits the "floor". In most games, this is just the region below the paddle.
We will be making a simple version of the game. There will (unfortunately) be no fancy spaceships or aliens flying around, no monsters to bash with the ball. There's just the ball, the bricks, and the surrounding environment. When the game starts, the ball will automatically launch from the paddle, and the player will then try to clear as many bricks as possible by keeping the ball in the playing area.
Game Basics: Our ball is a 2 by 2 square, and our paddle is a 12 by 2 rectangle. The bricks can technically come in any size and shape, and we'll get into how to clear out bricks of any size in a moment. The bricks will be loaded in from an image file. The game will start by drawing the paddle and the ball, along with the wall and the floor, then launch the ball and begin the main game loop. In any iteration of the loop, two things could happen. First, if the player presses a key to move the paddle, the paddle will be moved accordingly. Second, a timer will tell the game to move the ball once every fixed interval.
Since the ball is more than just a single pixel, we need some way of defining its position. For this project, let's just say this is the top left pixel of the ball. Same goes for the paddle.
Physics and Movement: As far as the physics goes, the ball moves at 45 degree angles from the axes, so the possible velocities are (-1,-1), (-1,1), (1,-1), and (1,1). In every frame (one loop of game execution), we'll first check for any collisions and reverse the velocity accordingly if needed. If the ball is moving up and hits something in the upward direction, for example, we will change the row velocity from -1 to 1 to tell the ball to move downward instead. Once we're sure that the ball can move, we will then move the ball into its new position. If at any time the ball collides with the floor, then it's game over.
Global Variables: To keep track of the current position and velocity of the ball, and the current position of the paddle, we will have to use some global variables. These are already placed within breakout.asm, so you need not put them in yourself. They will be accessible to every subroutine throughout the code, so use them carefully!
; global variables
BALL_ROW_POS		.BLKW #1
BALL_COL_POS		.BLKW #1
BALL_ROW_VEL		.BLKW #1
BALL_COL_VEL		.BLKW #1
PADDLE_COL_POS		.BLKW #1
Note that we won't need to keep track of the row position of a paddle as a variable, since the paddle can never move up and down. That will simply be a constant.
Speaking of constants, there will be a few in the game. We will need to specify the starting locations of the paddle and the ball and the starting velocity of the ball. These are provided in breakout.asm, as follows:
; Initial Constants Section

; Paddle Stats

PADDLE_ROW_POS		.FILL #116
PADDLE_START_COL	.FILL #58
PADDLE_HEIGHT		.FILL #2
PADDLE_WIDTH		.FILL #12
PADDLE_VEL		.FILL #2

; Ball Stats

BALL_START_ROW		.FILL #114
BALL_START_COL		.FILL #63
BALL_SIZE		.FILL #2

BALL_START_VEL_ROW	.FILL #-1
BALL_START_VEL_COL	.FILL #1
The size of the ball is actually also located at the label BALL_SIZE. However, since we know that the size of the ball will always be 2, you're welcome to hard code that fact when you're programming. Just remember to comment clearly.
A Little More User Control: Finally, since it would be really boring if the player didn't have any say in where the ball is going, we will complete the game by letting the ball's horizontal velocity be determined by where it hits the paddle. As the very last feature of the game to implement, we will make the ball go left if it hits the left half of the paddle, and go right if it hits the right half.
Abbreviations: By the way, a few of the abbreviations we will use are:
ABBREVIATION	MEANING

col		column
pos		position
vel		velocity
ref		reference
dir		direction
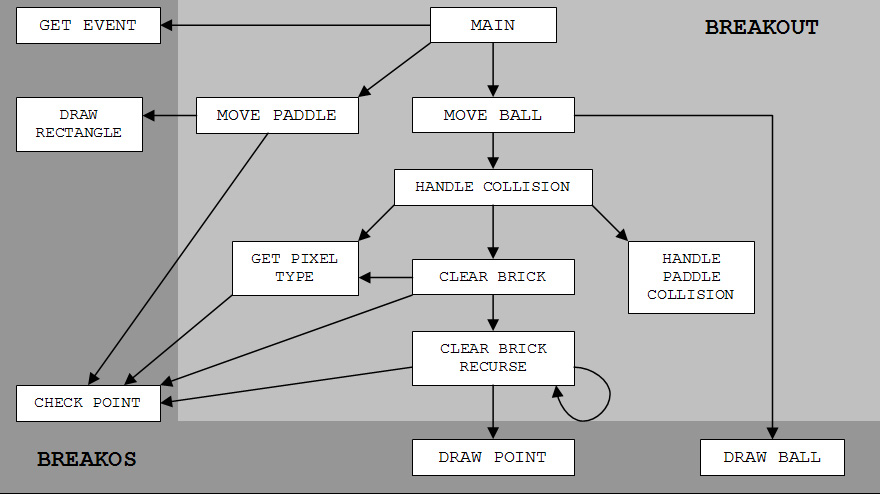
Call Graph: For the visually inclined, click here for a call graph describing the calling relationship between the Breakout/BreakOS functions. For example, an arrow from "Main" to "Move Paddle" means that the "Main" function calls the "Move Paddle" function.
The Stack Pointer: In this assignment, we will be using the user stack to save and restore registers. This needs to be done at the start of a subroutine or a trap since the caller may expect register values to be preserved when the subroutine returns. This is called "callee save" and will be covered in lecture. For now, you'll simply notice that within the breakout.asm skeleton code, provided, there are save and restore code blocks at the beginning and end of each subroutine, respectively. We will also need to initialize the stack pointer, which pointers to the current "top of stack". Note that this is done in the operating system (search for OS_START in breakos.asm; you'll see it soon after this point). Take extreme care when modifying R6. In other words, do not use R6 for any purpose other than as the stack pointer.
Calling Traps: Normally, to call the traps that you wrote for Homework 6, you will need to remember to choose between traps x40 through x44. However, we've provided a little shortcut for you. To call the five traps, you can use JSR with the below five labels. These are little "relay functions" that do nothing more than relay the call to the actual trap:
LABEL			CORRESPONDING TRAP

DRAW_POINT_TR		Draw Point (Homework 6, Part 1)
DRAW_BALL_TR		Draw Ball (Homework 6, Part 2)
DRAW_RECTANGLE_TR	Draw Rectangle (Homework 6, Part 3)
CHECK_POINT_TR		Check Point (Homework 6, Part 4)
GET_EVENT_TR		Get Event (Homework 6, Part 5)
Background Image: Finally, we've created a few background images to save you the trouble of drawing the bricks. They are included in the zip above as the set of breakbg.obj files. You may simply load one of these along with the other files when you get to test out the game as a whole, starting in Part 5.
Location of Parts: Due to load range concerns, the parts within breakout.asm will not actually be in the same order as listed below. Hence, the best way to search for a certain part is to do a find text on either the name of the subroutine, or, if you're just starting out or left the comment in there, do a find text on "Part #".
Location of Constants and Globals: You might have noticed that within the code stub we provided, the location of constants and globals seem quite arbitrary and scattered. The reason this is done is because loads and stores have limited range, so these values are placed where they might have the least chance of exceeding that range. If you find yourself with range issues, feel free to move these to other locations in the code that might be better. Just don't put them in the middle of a subroutine or they'll be executed as code!
Solution to Homework 6: Sorry, we won't be handing out a solution to homework 6. If you're having trouble implementing it, please see Prof. Lewis or one of the TAs.
Testing: Once again, test scripts are included in the zip file above. This is an especially hard assignment to test by script, since many of the functionalities are better seen, and once you get the whole game going, it is much more fun to test by actually playing it. However, for those who would like to write your own extra test scripts anyway, you may use the official ones as examples. You're also welcome to post on the forums if you have any questions.
By the way, there are no test cases for Part 5 because that's just the main game. Once you have that done, it's far easier to test by hand and see the ball bounce around than to create and test a script.
Code Size: You'll need to write a substantial amount of code for this assignment. Our solution consisted of approximately an additional 350 lines of LC-3 code (beyond what appears in the provided breakout.asm file).
To build the Breakout game you will need to write a number of function, which we describe here. Each part, below, corresponds to a function you need to write. Again, please refer to the call graph for a high-level view of the relationship between these functions. The stub for each of these functions (in breakout.asm) very clearly defines the function signature (arguments and returned value).
The code for this part is provided in breakout.asm. The only thing it does is draw the initial ball and paddle and set up the floor and walls, so if you run the breakout.asm code without any modificaton, you'll just see a paddle and a ball on the screen before the program halts.
We will begin with something easy. Since there are so many types of objects in the game, it would be nice if we had a subroutine that could tell us what object is at a given pixel location. This is exactly what we will do first.
The subroutine will take as input the row and the column (of the graphical display) to check. Then it will fetch the color at that position and compare the color against each of the colors of the known objects. If it matches none of those, then we'll just treat that color as a brick. The return value will simply be a number assigned to the object type found.
The object types are as follows:OBJECT TYPE COLOR LC3 COLOR VALUE RETURN VALUE Floor Almost Black x0001 -1 Empty Space Black x0000 0 Wall Gray x4210 1 Paddle Almost White xFFFE 2 Brick Everything Else Everything Else 3The pseudocode is provided below (Assume row and col are provided):
color = check_point(row, col)

if color == Floor_Color
    return -1
else if color == Black
    return 0
else if color == Wall_Color
    return 1
else if color == Paddle_Color
    return 2
else
    return 3
You might find the following list of colors helpful. They've already been declared within breakout.asm.
; Colors

COLOR_BALL		.FILL xFFFF	; White
COLOR_PADDLE		.FILL xFFFE	; Almost White
COLOR_WALL		.FILL x4210	; Gray
COLOR_FLOOR		.FILL x0001	; Almost Black
With the above implemented, we can then move onto the bulk of the collision handling. As mentioned before, before moving the ball, we will have to check whether there's anything in the way. Below is an example of a ball moving into a new position. Here, both the row and column velocities are -1, so the ball is moving up and to the left.
| C | A | |
| B | D | |
The black squares above are the ball's current position, and the gray squares are pixels that need to be checked. There are three new pixels that the ball will move into if it follows the current path, but at first we will only need to check the first two (marked A and B). If there's already another object in A, then the ball will need to reverse its row (vertical) velocity and go downward instead. Similarly, if there's already another object in B, then the ball will need to go right instead of left. Notice that if either of these two cases are true, we don't even need to check C since the ball is no longer going in that direction. However, if both A and B are blank space, then we'll need to check C to see if we need to reverse both components of the ball's velocity.
There's some shortcuts we can make to compute what positions we need to check. First, since the ball is not a single pixel, we can start by figuring out a "reference position" within the ball. This is D in the diagram. Once we have this reference position, we can just add the components of the ball's velocity to it to figure out the positions to check. For example, if D is in position (row = 2, col = 2), then we can add -1 to the row position and keep the col position as is to get the position of pixel A. We can also add -1 to the col position and keep the row position as is to get the position of pixel B, and add -1 to both the row and the col of the reference position to get the location of pixel C.
Along the way, we'll also need to react to the objects that the ball collides with. If a ball hits a brick, it will need to clear that brick; if a ball hits a paddle, it will need to figure out which horizontal direction to go in; if a ball hits the floor, then the game will be over. For now, let's just leave those functions as stubs. We will worry about how to implement them later.
There won't be any inputs to this function, since the ball's position and velocity are globals. The function will, however, return the following values:
RETURN VALUE		STATUS

0			No collision with the floor was encountered.
-1			A collision was encountered with the floor and the game is now over.
The pseudocode is as follows (assuming ball_row_pos, ball_col_pos, ball_row_vel, and ball_col_vel are globals):
has_collision = 0

; first, determine the reference position

if ball_row_vel < 0
    ref_row = ball_row_pos
else
    ref_row = ball_row_pos + 1

if ball_col_vel < 0
    ref_col = ball_col_pos
else
    ref_col = ball_col_pos + 1

; check pixel "A"

check_row = ref_row + ball_row_vel
check_col = ref_col

type = Get_Pixel_Type(check_row, check_col)

if type == Floor
    return -1
else if type != Empty_Space
    has_collision = 1
    reverse row velocity
    if type == Paddle
        Handle_Paddle_Collision(check_col)
    else if type == Brick
        Clear_Brick(check_row, check_col)

if ball_col_vel < 0
    ref_col = ball_col_pos
else
    ref_col = ball_col_pos + 1

; check pixel "B"

check_row = ref_row
check_col = ref_col + ball_col_vel

type = Get_Pixel_Type(check_row, check_col)

if type == Floor
    return -1
else if type != Empty_Space
    has_collision = 1
    reverse col velocity
    if type == Paddle
        Handle_Paddle_Collision(check_col)
    else if type == Brick
        Clear_Brick(check_row, check_col)

if has_collision == 1
    return 0

; no collision yet, so check pixel "C"
check_row = ref_row + ball_row_vel
check_col = ref_col + ball_col_vel

type = Get_Pixel_Type(check_row, check_col)

if type == Floor
    return -1
else if type != Empty_Space
    reverse row velocity
    reverse col velocity
    if type == Paddle
        Handle_Paddle_Collision(check_col)
    else if type == Brick
        Clear_Brick(check_row, check_col)

return 0
Whew, long function. If you look at the code closely, however, you'll see that there's really four big sections. The first determines what the reference position is, and the next three are really copies of each other that check and handle the three possible cases. Note that right before the very last case, if there's already a collision, then we can already finish up the function.
You might find yourself running out of registers as you're coding this up. Don't forget that you can swap values in and out or simply "create" less convenient registers by predefining a memory location and using load/store instructions to manipulate it.
After going through that huge subroutine, let's do something a bit easier. This subroutine will take care of the entire process of moving the ball once. This might sound like a lot, but the bulk of the work has already been done in the collision checking function. All we have to do here is check for collision (via the subroutine from the previous part), then move the ball if no collision was encountered.
There's no inputs to this function either, and the return values are -1 if the game is over, 0 otherwise.
status = Handle_Collision()
if status == -1
    return -1

Draw_Ball(ball_row_pos, ball_col_pos, Black)

ball_row_pos = ball_row_pos + ball_row_vel
ball_col_pos = ball_col_pos + ball_col_vel

Draw_Ball(ball_row_pos, ball_col_pos, ball_color)
Note: There is technically a minor bug within Part 2 and Part 3 that can be fixed with a small code change to one of the two parts, but leaving it as-is makes the game's animation look better! If you've got a good handle on the coding, taking a few minutes to think about this. If you figure it out, post it on the forum (worth a couple brownie points!).
This is another rather simple function. Basically, the paddle will move two pixels horizontally, so a total of four new pixels have to be checked before the paddle can be moved. However, as a performance hack, let's just check the top two. While there will be a very small chance that the ball is right under the paddle and to the side, and the paddle will step over it, the primary purpose of the check is to keep the paddle between the wall boundaries, and we know those span both rows that the paddle is drawn on. In any case, if the paddle can be moved, then move the paddle by erasing and redrawing it at the new position.
You can assume that paddle_row_pos and paddle_col_pos are global variables. The inputs to the function is just one number "dir". If it's 0, then we want to try to move left. If it's 1, then move right.
check_row = paddle_row_pos

if dir == left
    check_col = paddle_col_pos - 2
else                                  ; dir == right
    check_col = paddle_col_pos + 12

color = Check_Point(check_row, check_col)
if color != Black
    return

color = Check_Point(check_row, check_col + 1)
if color != Black
    return

; now we can move the paddle

Draw_Rectangle(paddle_row_pos, paddle_col_pos, paddle_height, paddle_width, Black)

if dir == left
    paddle_col_pos = paddle_col_pos - 2
else
    paddle_col_pos = paddle_col_pos + 2

Draw_Rectangle(paddle_row_pos, paddle_col_pos, paddle_height, paddle_width, paddle_color)
Note: While PADDLE_WIDTH and PADDLE_VEL are listed as constants in the asm file, I've hardcoded the values in the pseudocode for efficiency purposes. You're welcome to either load the values or hardcode them into the subroutine.
Now we'll tie everything together and get to see most of the game come alive. With this done, you should be able to juggle the ball with the paddle and see it bounce between bricks. The bricks will still stay there after the ball hits them, but at least you can see some of the game in action!
The main function assumes that you already have the background image loaded. It first initalizes the ball and paddle positions and the ball velocity, draws the ball, paddle, walls, and floor, then goes into the main loop. In each iteration of the loop, we'll get the next event (whether it's a keypress or the timer going off) and handle it.
load initial position and velocity values into global variables

Init_Video_Memory()

Draw_Ball(ball_row_pos, ball_col_pos, ball_color)
Draw_Rectangle(paddle_row_pos, paddle_col_pos, paddle_height, paddle_width, paddle_color)

loop:
    e = Get_Event()
    if e == -1
        break from loop
    else if e == 0
        game_over = Move_Ball()
        if game_over == -1
            break from loop
    else
        dir = e - 1
        Move_Paddle(dir)
    goto loop
Once we have the framework of the game done, let's get those bricks cleared. We'll actually be implementing two functions here. The outer function, Clear Brick, first does a sanity check to verify that the object at the pixel to be cleared is actually a brick. Then it calls Clear Brick Recurse to do the actual job. Clear Brick Recurse will recursively sweep through and clear out an entire region of the same color. This way, we can clear bricks of any shape and size!
Pseudocode for Clear_Brick (assume row and col are given):
type = Get_Pixel_Type(row, col)

if type == 3
    color = Check_Point(row, col)
    Clear_Brick_Recurse(row, col, color)
Pseudocode for Clear_Brick_Recurse (assume row, col, and color are given):
curr_color = Check_Point(row, col)
if (curr_color == color)
    Draw_Point(row, col, Black)
    Clear_Brick_Recurse(row - 1, col, color)
    Clear_Brick_Recurse(row + 1, col, color)
    Clear_Brick_Recurse(row, col - 1, color)
    Clear_Brick_Recurse(row, col + 1, color)
Almost done! Almost done! Up to this point, the player has really no control over where the ball goes, but this is about to change. We'll be implementing a function that'll only be called if the ball hits the paddle. Instead of just having the ball bounce off normally, we'll figure out which half of the paddle the ball hit, and change its horizontal (column) velocity accordingly.
The pseudocode is as follows (You can assume ball_col_vel and paddle_col_pos are globals, and ball_col_pos is in R0. The reason we can't just use the BALL_COL_POS global is because the ball_col_pos to check is the one that the ball will have been at had the paddle not been in the way, and not the current ball position.):
limit = paddle_col_pos + 6

if ball_col_pos - limit < 0
    ball_col_vel = -1
else
    ball_col_vel = 1
If you are a master LC-3 hacker and you finish HW 7 early, you might want to add some more features to the game. For example, you might want to display a score to the text display (or maybe to the graphical display!). BUT... Make sure your code works according to the above specifications before you embark on anything extra. Also, please make sure any extra features you add do not change the behavior of the program as we have specified (i.e., make sure you don't confuse our testing process).
Note: We know some of you may be enthusiastic, but don't go nuts on extra features and miss out on other important work!
Problem 1 (15 pts): Implement Part 1.
Problem 2 (36 pts): Implement Part 2.
Problem 3 (15 pts): Implement Part 3.
Problem 4 (24 pts): Implement Part 4.
Problem 5 (24 pts): Implement Part 5.
Problem 6 (36 pts): Implement Part 6.
Problem 7 (15 pts): Implement Part 7.
Total: 165 points.
Please submit your breakout.asm file online at the CSE240 submission site. This is due by MIDNIGHT on the due day (note that this gives you a little more time). Note that the submission site is not yet live (but it will be soon).
Here's the call graph mentioned above.